Quilting Butterfly Wings and a Great Deal on My Class

Bet that title got your attention! When life hands you many quilting samples and halloween is coming, you make butterfly wings out of them. Or at least you do when your daughter wants to be a butterfly fairy princess!


I'll try to get some pics of the winged princess later. I could have saved myself a bunch of time with those cheap discount store wings, but they're made for younger girls and are usually broken in a few days.


As a Christian, I've always been conflicted about halloween and this was the first year we decided to let them dress up and take them to a "Trunk or Treat". For those who don't know what that is, it's like trick or treating but in a parking lot using car trunks instead of houses. It's become more popular in rural areas where houses are far apart, and it's also seen as more of a community event and safer. Ours was at our new church and keeps the costumes in the realm of 'cute' instead of gory or oversexualized.


The kids and I had fun making some simple costumes. I'll have to get some better ones of the wings. She didn't want to stop twirling long enough for a photo. Made the skirt too. It's a hi-low number and it looks to have rotated to the side with the twirling!

I also wanted to let you know Craftsy's got a great sale going on this weekend! Fall is such a great time to snuggle up on the couch and do some handwork, work with yarn, draw, embroider, or learn new skills at Craftsy. Stay in your PJ's and learn a new skill or expand your current skills. All classes are up to 50% off when you use my discount link: sorry, the link has expired.


Now I've got to see if I can get the sparkles off of my sewing table!

Quilting with Rulers: Video of Double S Ruler

I am so happy to finally post this video! It's been sitting on Youtube, unpublished for several weeks because I had sold out of the ruler I show here and it was out of stock with my distributor. I think it's one of my best videos so far, shot in almost one take!


I love the elegant look that this double S curve ruler gives to a triangular space. It's a little fiddly to work with so I share some tips for getting better results. It is a full 1/4 inch thick ruler, so you have to be careful to avoid using it behind the foot of some low-shank machines.

I used it in the four corners of my ruler work sampler quilt, which I've shown a few peeks here and there, but I'll show all four corners in my next post. Each corner is done slightly differently, but because they're each done with the same 'frame' and then feathered the same way, the difference is fairly subtle.

The ruler is now available at the shop again, Ronda's Double S Ruler. It makes such beautiful curved crosshatching in triangles.

Quilty Ramblings

Last night I was happy to teach beginner free motion quilting to a little group of ladies. We did a lot of laughing, stitching, and more laughing. Since the danger of taking a class from a blogger is taking pictures, these two gals were nice enough to let me take a few snaps with my phone.


The shop where I work part time is very small and while I could make arrangements for a larger class elsewhere, these intimate classes fit my schedule and I'm able to give one one one attention. One gal hadn't ever used a free motion foot on her Pfaff and since I'm not familiar at all with Pfaffs, we had to figure it out together. With a bigger class I wouldn't have been able to take the time away from the group.


Another quilter was able to use one of the shop's machines as she didn't want to bring her machine from home. Since she's thinking of getting a new machine, what better way to show her the Janome 8900?

As part of my beginner free motion quilting classes, we draw the designs we're working on. I provide a laminated reference sheet for each student with tips and guidelines for FMQ and we draw on the back with a dry erase marker. Yes, I think drawing designs first is that important!

I've gotten a little bit more done on my sampler quilt too. I was going to work on it more today, but hubby was rained out at work and we took the opportunity to enjoy the time together without kids. I think the last time he and I had a meal out together without them was Valentine's Day.


It's a rainy but colorful day here in Virginia with all the leaves showing their fall glory. Above is my view as I look for the school bus from my porch. The hot pink geraniums are still doing their thing on my porch and the Japanese cherry is turning a lovely yellow-orange. You can see a neighbor's dogwood in the distance.

Wherever you are, I hope you are safe, dry, warm, well-fed, loved, and able to do something creative. We are all well blessed if so.

Quilting with Rulers: Filling Between the Lines

Yesterday I showed you my diamond filled star. Today I took a little time to add some fills to my diamonds and I really like the result. At least after I did a couple.

The center fill is a cross between the design 'ribbon candy' and figure eights. I bet there's a better name for this, but I don't know it. Anybody have an idea? I see this a lot in custom long arm work.


Then I skipped a set of lines and stitched pebbles in graduated sizes to either side. The first set (above) was entirely unmarked freehand. It wasn't too wonky, but the spacing was not good. I whipped out my trusty air-eraseable purple pen and marked the center pebble, then six to either side. That came out a heck of a lot better.


I am having so much fun with this ruler sampler as it really challenges me to do something new with each space and block.

Tomorrow I'll be teaching another beginner free motion quilting class locally and I'll be taking this in to show one of the gals who is a new friend and reads the blog.

In other news, Leah Day has taken up quilting with rulers on her new Juki sit-down long arm and given my class on Craftsy a shout out  (25% off link to Quilting with Rulers on a Home Machine right here). That's pretty cool!

I've got a shop update for you. If you've been putting off buying a ruler foot because it seemed kind of spendy, we are now offering the Westalee Ruler Foot Starter Set without the feather template which allows us to drop the price by $20! I know so many of you already have made a ruler foot purchase, but if you haven't, or if your friends are now interested in how you do these cool designs with rulers, you know where to go to get your supplies.

Thank you for all your support and wonderful comments!

Quilting with Rulers: Stars and Diamonds

I'm working on my ruler work sampler and I'm putting diamonds into this star block. My mind keeps pulling up the chorus, "Lucy in the sky with diamonds...."

free motion quilting with rulers on a domestic or home machine diamonds in stars

The great thing about putting diamonds into blocks this way is that it can be done without a bunch of starts and stops. I'm just about done with it, but I haven't decided if I want to go back in and put some fills into the diamonds and really make them pop.

ruler work quilting with rulers to guide free motion quilting on sewing machine

I was inspired to adapt the ruler work technique from long arm quilters and use it on my home machine to guide my free motion quilting, and I've learned a bunch from looking at the work of professional long arm quilters.

They quilt a lot more quilts as it's their job and have so many great designs that not only look great, but also reduce the number of stops and starts for more efficient quilting. I am in awe of how they can figure out how to quilt large complex areas with several designs with a great plan that allows them to use one start and one stop.

I am getting better at it, but it seems as if I get halfway done with an area and then find a way I could have stitched it more efficiently! Sometimes I'll finish up an area and after I've cut my threads to move to a new area, I find a way I could have kept going. Then again, since my quilting times come in tiny little sessions with frequent interruptions, I'm not sure it matters for me to do it more continuously.

How about you? Do you look for was to stitch more continuously or do you not mind frequent starts and stops?

Quilting Tip Video: How to Remove Stray Threads Inside the Quilt

I've got a great little quilt tip on video for you today. Have you ever found after quilting your top that there are dark threads showing under light colored portions of your quilt. How annoying!

Watch and see how I fish those little stragglers out.


I cannot believe how easily I hooked that thread out! Trust me, while it's not hard, I rarely hook it that fast!

Now I'm back to quilting on this sampler. I love how it's turning out, but I am so ready to be done with this piece and move on to something new!

When I was a Newbie Quilter

I know I should save this photo for a "Throw Back Thursday" post, but I just had to share this one with you before I chickened out! This is Christmas Day of 1987 and I was a senior in high school. I had been sewing up to this point with my mom's old Singer. She had a beautiful old black machine in a wooden case, but it had a short somehow and the knee lever that functioned like today's foot pedal would give me a tiny zap if I sewed in shorts.


Since we lived in Florida, you can imagine I needed a zap-free machine! I had completely forgotten this machine over the years and I can't even remember what happened to it. I know there was at least 2 machines that came and were upgraded before I got my first Janome. But I sure looked happy to get it. I sure would like to know where all those curls went.

The rotary cutter had just begun making inroads in the world of quilting and it was a good thing as I am accuracy challenged. My first quilt involved scissors, cardboard templates, and Y seams because I didn't know any better! It was a disaster.

free motion quilting with rulers

I have been working on my ruler work sampler quilt whenever I can. I tell you, I am not sure where my days are going lately, as it doesn't feel like I'm getting much done and I have some new projects I need to start on.

I ordered some of the Janome ruler feet (Frame Quilting Foot Set) last week for my shop at Amy's Quilting Adventures and wouldn't you know it? There's been a run on that product and they're out of stock! Could it have something to do with the over 4500 students enrolled in my Quilting with Rulers on a Home Machine class at Craftsy? (That's a 25% discount link BTW) I should get them late this week or next week. I've also got the Ronda's Double S ruler on backorder too. Hope to get those soon as well.

The class has received great reviews and Craftsy's platform doesn't allow me to leave a comment on those reviews so I can't leave my thanks on the glowing recommendations. Seriously?! 4.85 out of 5 stars! Incredible. So if you've left a review, know that I really appreciate it!

That's all I've got for now! Keep on quilting!

Quilting with Rulers: Double Curved Frame

Since my machine decided to start cooperating since my last post (Thank for all the tips and/or commiseration!) I was able to get some free motion ruler work done on my ruler work sampler.

quilting with rulers Janome ruler foot
I'm using the Janome ruler foot combination on my Janome 8200.

This is a large setting triangle along the side of my quilt to set 12 inch blocks. I had originally planned to run a curved ruler along the two shorter sides and do curved cross hatching. But even though I have 4 rulers long enough to reach across those 12 inch sides, I decided to do a design that uses a smaller, shorter ruler.


I decided to do it this way because the larger rulers are not usually the rulers that most domestic machine quilters start off with. They're harder to maneuver, more expensive than smaller rulers, and while it's good to eventually have at least one, they're less common. I also had done the same design around the center block of this quilt, so repeating it is good design sense- even for this very eclectic quilt.


The 'frame' of this design is done by using a smaller curve, in this case I used the QPC #10, but other rulers that would work great are the QPC #8, #12, the Westalee 12 inch arc/straight ruler that comes with their foot, the Westalee 8 inch arc, as well as the 12 inch arc, and other templates long enough to span from corner to center edge of a 12 inch block. In case you're wondering, a 12 inch arc is not long enough to stretch from corner to adjacent corner on a 12 inch block and the curve is too deep.


Then I echoed the frame 1/2 inch to the inside to make a great frame around two sides of the triangle. Next is to fill inside the frame. I want to do curved crosshatching here somehow, but it really doesn't work with the double scallop of the sides. I did straight crosshatching instead at a 1/2 inch spacing.

There's the last spot of trouble I had with my machine. I did go back and fix it.

Since this is a setting triangle in a quilt set on point, it looks like diagonal crosshatching, but is actually straight crosshatching. Why does that matter? It means that you can't use the method for reducing backtracking when crosshatching on the diagonal. (I show this in my class on Craftsy, Quilting with Rulers on a Home Machine. That's a 25% off link!)

The next one of these I do, I'll make sure to mark down the center and maybe a few registration lines to keep the diagonal lines looking more centered down the block. I'll also do some variations in the other setting triangles like I did with the quilt's corners, where the frame is the same, but the inside is done differently. I also think this frame would look great with a regular free motion quilting fill in it.


My creative daughter is at it again! This time she created me "a coloring page for grown ups" using a stencil set. With the arrows, it reminds me of Karlee Porter's Graffiti Quilting.

I'm looking forward to getting more done on this quilt and moving on to something new asap. I hope you have a lovely, creative weekend.

Free Motion Quilting: Trouble Shooting

Today, I made sure to prioritize my quilting to be done early in the day instead of letting everything else push it to the side. So proud of myself too for putting this project at the top of my list of things to do. I should knock out this section quickly....stitching along and....


Snarly messes of top thread. Ugh.

I got stubborn and kept stitching here and it went back to good stitches!

I have this issue every once in a while. Still haven't solved it. Can't get the machine to do it when I take it to the dealer (had the same issue on my old machine too) and my hubby who is pretty knowledgeable when it comes to sewing machines can't quite figure it out either.

Can you see the loop of top thread going around the bobbin thread?

I have two theories:

  1. The needle is piercing the 'working' thread as the stitch is being formed. The working thread is the length of thread that is pulled around the bobbin case with each thread. Any one point on the thread gets pulled down into the bobbin case many times before finally laid down as a stitch. I try to avoid this by not stitching directly backward (pulling quilt towards myself). But this usually results in broken thread.
  2. The plies of top thread for some reason are coming apart and the hook is grabbing only part of the thread to form a stitch. I used to think this was only with a thick thread and maybe my hook was damaged or just a tiny bit out of time. But, no damage, and this issue comes and goes with no rhyme or reason and with different threads.
It's very annoying. Most of the time, the thread doesn't break. The stitches look awful for a bit and will most of the time straighten itself out and I could keep stitching. In fact, I even shot a video of this for you, but Youtube is loading slow for me tonight. This is the same thread and quilt that I've been quilting on with no issues for quite some time.

After shooting the video, I turned my machine off and did something else for an hour or so. When I started stitching again, there was absolutely no issues. Go figure.

Using quality polyester thread- a little slippery, maybe a thread net would help. I even spooled off several meters in case the thread was defective. Threaded properly, tension good in between episodes, and I'm experienced enough to not have issues to to jerky hands. Good needle, etc.

Just goes to show that even when you're an experienced quilter, things still go wrong now and then. So if you are just starting, don't give up when having trouble. Change a setting, thread, needle, tension, foot height, etc. and see if that helps. But sometimes this free motion quilting is just so different from the sewing that these machines were designed to do, that you might have occasional mystery issues.

Free Motion Quilting with Rulers Video: Baptist Fan Template Demo

Last week I shot a video demonstration of the TopAnchor Baptist Fan Rotating Template for the maker of these templates at their request. It's a bit of a tricky template for those of us who move the quilt instead of the machine to free motion quilt, but they were getting questions about using it with sit down long arms and since they use the frame mounted variety when developing their templates, they asked me to demo it.


I've told the company that I find it tricky, thus I wasn't sure I'd recommend the template for use with stationary machines, since this design can be done with other methods, but if you did a lot of this design, which is great for a cuddly quilt, you might find it an excellent help.

The closer to the center anchor point, the harder it is to use, but being able to use one template for this design is pretty awesome. If I were to use it, I'd start farther out from the center and if need be, use a different design to fill in the center.

For a frame mounted long arm, I bet this thing is awesome!

Now I'm off to go quilt on my ruler work sampler. I even have the new TopAnchor Celtic Knot template prototypes to play with. I can't wait to get these listed in the shop! I may offer them as a pre-sale option. I started this sampler for my Craftsy class, Quilting with Rulers on a Home Machine (25% off discount link there) and it is just ridiculous that I have yet to finish it!

By the way, I totally revamped the shop for easier navigation last week. I'd love to hear what you think of the new design.

Celtic Knot Templates!

I am so excited about these Celting Knot Templates from TopAnchor! I'm going to tease you with this picture until later this week as it's such a beautiful day here that we're taking the kids up to the Blue Ridge Parkway for some hiking and fun.

quilting with rulers celtic knot rotation template from TopAnchor


The bigger size is one I used in my Craftsy class (25% off discount link!) and it will be available towards the end of the month. You can't see it in this picture, but there are 1/4 inch markings along the straight side and the half circle, so it is very versatile!

Free Motion Quilting Practice: Feathers Top to Bottom

Yesterday I shot a video demo for the folks at TopAnchor Quilting Tools. They make these incredible rotating specialty templates for quilting with a long arm. Since I started using and teaching about using rulers and templates to quilt with stationary machines, many of their products have also been sold to users of (mostly high shank) sewing machines and sit-down long arms.

I showed how to use their Baptist Fan template. It's a very tricky template to use on a stationary machine, but they tell me that there have been plenty of quilters curious about how to use it on a stationary machine, so a video is one of the best ways to show it.

I'll be uploading that video to YouTube shortly, but in the meantime, I used the sample to do a bit of free motion quilting practice. I got home from work dead-dog tired. I love working at the Janome dealership, and am full of enthusiasm when I'm there, but I am an introvert and I kinda crash after a full day there.

free motion quilting feather practice
Those arcs are made with the Baptist Fan template

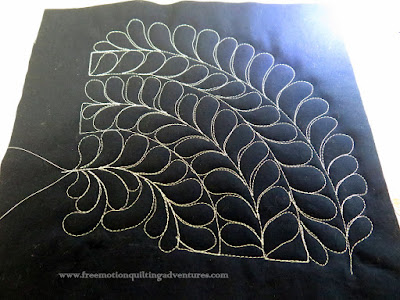
Doing some completely free quilting, no need for a finished project, helps fill my batteries! I grabbed the sample and began to use the stitched arcs as feather spines.


Free motion quilting practice feathers
Feathers, made from bottom to the top.

It wasn't long before I reached the top of a feather and decided I really need to practice stitching feathers from the top down. I always, always stitch my feathers from the bottom to the top. It means planning ahead to how you will get from the top of a plume to the bottom to finish out the other side. But I know there are talented quilters who can do feathers 'backwards' so I decided to give it a try.

practicing stitching feathers from top to bottom
First run of 'backwards' feathers, going from top to bottom of the spine.
In the picture above, my seam ripper is pointing down the feather in the direction I stitched. (No cute pointer hand this time; my son took it with him to Grandma's house!) The first plume wasn't bad as there was no other plume to fit it against. Then I was committed. It was a bit wonky after that, but like everything, it got better (mostly) with practice.

practice free motion quilting designs feather plumes
Not too bad. Everything gets better with practice.
The last two rows of plumes were stitched backwards as well. Some were pretty wonky, but it wasn't too horrible. I tried to picture in my mind what the whole plume looked like as I stitched. It was hard to keep from over-doing the lower curve of each plume and to get the area where the plume met the spine from being to wide and straight. But it was good practice.

I like to think of such practice as good exercise for my brain. I wrote about how quilting is good for preserving the gray matter in my newsletter that came out this past Tuesday. You are signed up for my newsletter, aren't you? You can sign up over on the right sidebar.

I'm sure some of you will wonder if I will carry the Baptist Fan template in my shop at Amy's Quilting Adventures. While I aim to provide a great collection of rulers and templates for ruler work, right now I'm not carrying it. As I said, it is very tricky and probably best suited to long arm systems (sit down or regular) but you can certainly buy it through TopAnchor.

My question to you is: What ways are you challenging yourself in your quilting practice? Are you trying new shapes, threads, designs? Maybe you are wanting to try ruler work (You should check out my class at Craftsy- Quilting with Rulers on a Home Machine!) or even try a new piecing technique.

Let me know in the comments what you are doing to stretch yourself when it comes to quilting or creativity.

Frame Quilting Foot Set, aka Ruler Foot

Something came across my desk at work this week from Janome that made my day. So many of my Janome (or Janome foot) using friends have still been running into Janome dealers who tell them the Ruler Foot in the Frame Quilting Foot Set is only for the 1600P. Not so! I did get official word of approval from Janome on the use of the ruler foot about 18 months ago with all the Janome Convertible Free Motion Foot Sets, but there were still dealers that didn't know.


This week, Janome released a new document to showcase all the Janome accessories and this picture above was part of it! Yay! We're legit! This should make getting a foot from a dealer unfamiliar with the ruler work technique a bit easier. Or you could order from my shop....

frame quilting foot set- aka ruler foot for free motion quilting with rulers

In case you are wondering, that second foot is fabulous if you put your machine into a frame system, or get creative and decide to do your free motion quilting from the end of your machine. Otherwise, it's not much use.

I'm getting some quilting done today, so that's all I've got for now. Stitch on!

Never Underestimate the Power of a Woman with a Sewing Machine, Revisited

You might remember this project from a post published last November. It's been needing a little something more and this weekend I finished it off. If you didn't see that post and I know there are a bunch of new readers here, go check it out and watch the two related videos, one is a speedy time-lapse number. We'll be here when you're done!


 The stitching was great but just not dense enough for the letters to pop out and be readable from a distance. Since this has been my battle-cry of sorts this past year, I wanted to see those words.


Using a technique I learned from Irena Bluhm several years ago (from her QNN videos), I used Dewent Inktense pencils and textile medium to carefully paint inside the stitching of the letters. It's kind of hard to get the shading just right without adding so much water that the color bleeds, but I really like the results.

never underestimate the power of a woman with a sewing machine

I think it's a lot better now that the words are colored. This is hanging in my studio directly across from the front door, so I can see it often and if it serves as a little reminder to those coming in the house that I'm not just sitting around eating bon-bons, I'm OK with that.

I'm working on getting my newsletter ready to send out this week. If you haven't subscribed to it, there's time. Just enter your first and last name as well as your email address in the short form along the right sidebar.

Hope you've made some time for creativity in your life this weekend!

Feathers Make It All Much Better

Today was one of those days when you wish it was over by about 10am. Nothing majorly serious, but just a series of smaller things going wrong that just piled up. Fridays I usually work at my local Janome dealer's shop and the school board decided to have early dismissal for all the schools in the county due to the rain. (Yes, rain. But we've had a lot of it already and a hurricane is supposedly coming and some of the schools are in a river basin area, so there were flooding concerns. This ex-Florida girl is having a hard time being kind about it.) Then there was a broken hot water pipe, no shower for me. One kid had a fever, another missed the bus, etc.

free motion quilting feathers and ruler work on a sewing machine


But the hubby was home due to said rain also, and I did get to do some quilting so that's good. I started filling the center block edges on my ruler work sampler. It went very well, and I can't wait to show it all to you later. I'm hoping to show you the technique I used to get the feathers pretty even, but I learned it from someone else and I want to run it by her first.

My goal this weekend is to get this block completely done. It's nearly there, so surely I can meet that goal.