Here I am!


So, I hate having my picture taken. But I'm working on facing fears and trying new things, so here I am. This was taken at the Sacred Threads Exhibit, in front of my quilt. The exhibit is now over and I am eagerly awaiting the return of my quilt.

While trying to get a decent shot of myself, and by decent I mean I don't look enormously fat, pregnant, grumpy, red-faced or really awful, I learned that sometimes when I think I am wearing a cheerful face, I'm really not smiling much. Gotta work on that. I'd hate for folks to respond to me like I'm grouchy and unapproachable when I'm just a bit shy.

Now I've got to get to quilting. I finished my commissioned quilt with the tree and owl and the customer loved it. Now I've actually got a quilt to quilt for someone else, but I can't share it. Yes, I'm being mysterious....that's me; a woman of mystery. LOL: people who know me know that I'm pretty open and honest, so don't read too much into it. There's no book deal or anything going on. Though that would be fun!

I'll post pics of the tree quilt tomorrow hopefully.

Sacred Threads Part 2

The following images are all quilts from the 2013 Sacred Threads Exhibit, which is in Herndon, VA. That's near Washington DC, and it runs through this coming Sunday, July 28.

There are so many quilts that it was hard to pick just a few to share. This quilt was near the beginning of the exhibit, and as I rounded a corner I was thinking how blessed I was to be able to get away with a friend and see this exhibit for a whole weekend. My eyes landed on the heart and for a moment I saw "You Time"! Kind of felt like a voice telling me it was ok to take this time for myself..

"Rooted in the Heart" by Amelia P Morusiewicz, Mitchellville, MD.
 The trunk of this tree (I have a fondness for trees, you know) looks to be done with Texture Magic in a very wonderful application.

The following quilt is by Patty Powers who lives pretty close to me. We have begun to attend a small textile art group together. I love how she handles color in this piece!


I found this next piece just lovely! Peaceful and beautiful. I was calmed just by looking at it and thinking of the 23rd Psalm from which this piece is inspired. Still waters indeed. The quilting was beautiful, the whole piece was just wonderful, and paisleys for leaves? Brilliant!

"He Leads Me By Still Waters" by Sharon L Schlotzhauer from Colorado Springs, CO.


Sacred Threads had an 'Artist in Residence' this year. Dominique Ehrmann from Quebec, Canada creates quilts in 3D. The best way to explain her large work in the exhibit is that it is a series of four quilts layered about 6 inches apart, each depicting a layer of the total image.


It has an incredible amount of detail and of course, depth to it. It has a quality that reminds me of stage props, in that I can imagine a puppet to appear, ready to perform in the midst of the scene. The first part of her statement is below.


Larkin J Van Horn of Freeland, WA created "Pentecost" below.


The quilts in the grief category were up on the stage of the exhibit, and displayed in a way to separate them from the main path of the exhibit. Having bawled my eyes out at the 2011 show when reading the statements of several of the grief quilts when I was in a very fragile state during my husband's cancer treatments, I appreciated this.


Helen Turnbull, of Broad Run, VA created "The Broken Branch". It symbolized her daughter who died in an accident. I was very moved by this quilt and its story, besides being a beautiful work on its own.


Betty Busby, from Albuquerque NM, created "Mourning Doves". I found the piece disturbingly beautiful. Again, this was in the grief section of the exhibit, so I wasn't expecting sunshine and rainbows. Each feather of the doves was an individual raw-edged appliqued piece and further enhanced with stitching and a bit of paint.


Sacred Threads is an exhibit of spiritual themes, but not necessarily Christian based. Judaism was well represented as was Hindi, Buddhism and other faiths. Chrishna made an appearance too. And not all quilts had a particular religious link to them. This white on white quilt was quite large and rather breath taking.

Made by Pierra Vernex of Quebec, "Simply Mandalas" featured dense free motion quilting, machine embroidery and decorative machine stitches.


Nancy Kay Smith of Belleview FL, created "The Journey Through Lent and Easter" below:


I found it absolutely stunning! I hope this quilt graces the wall of whatever church she attends!

I wish I could show more pictures! You can purchase a book or DVD of the quilts in this year's exhibit at Sacred Thread's website.

I'm linking this post with Nina Marie's Off the Wall Friday. Go check it out.

Free Motion Quilting Video: On Fusible Appliqued Leaves

I did a video while I was quilting on the newest tree quilt I'm doing as a commission for a friend.


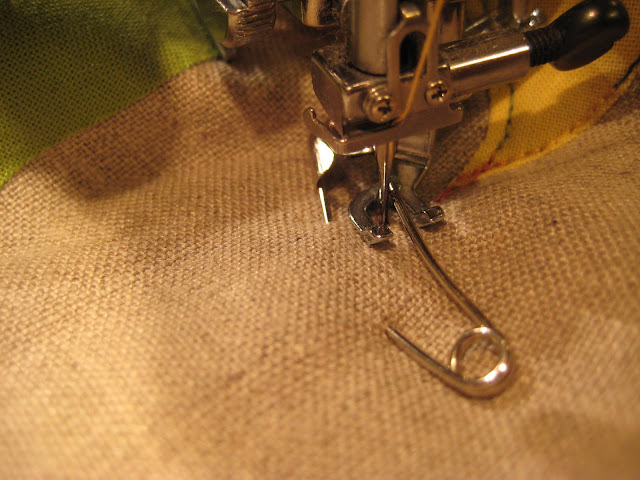
In the video, I stitched dangerously close to a basting pin and put a warning on the video. You don't want to end up breaking a needle! But I don't take my own advice apparently. I did not break my needle, but if you look closely at the picture below....

stitched a basting pin

You'll see I stitched right over the pin! Maybe I should buy a lottery ticket. I had to break thread and tie off when I got the pin out, but otherwise the pin was easily removed. Note to self: Stop stitching further from pins!

I'm linking this post with Leah Day's Free Motion Fridays link up at The Free Motion Quilting Project

Darn Free Motion

I used my free motion quilting skills the other day to go old-school. You've seen the free motion foot referred to as a darning foot in many places and that's exactly what I did.


 I had a small hole by the zipper of a pair of my jeans. I slipped a small piece of fabric behind the hole then free motion stitched around the hole. After I had circled the hole, I began stitching back and forth across the hole to basically create new fabric and hold the worn spot together.


I should have chosen a better blue thread to blend in better. If this had been in an area other than between the biggest part of my stomach and my crotch, I might have chosen a decorative thread color and made it more of an embellishment. A great idea for a hole in the knee!

Since the darning is done in free motion, you don't have to worry about moving the garment around so much. That's a big plus if patching down in a leg or sleeve of a garment.

Did you know you can also use the free motion/darning foot for long basting stitches? Depending on your skill level, they might not be as even as a machine basting stitch, but it you need a longer basting stitch than what your machine will give you, it's a great method.


Sacred Threads Exhibit, Part 1

I went up to visit my quilt in the Sacred Threads Exhibit up in Herndon, VA last weekend and to chit chat and visit with other artists during the Artists' Reception.

First things first, my quilt, Poured Out 2, hung nicely. Though the corner spot was a bit dark and didn't show off the quilting to the best advantage with that black background. I recieved a lot of compliments on the work and my favorite was from the husband of another artist, who said my statement about the making of the quilt really blew him away and caused him to do a double take and really look more closely at the background to see the full impact of my quilt.

Poured Out 2 at Sacred Threads
Poured Out 2
This gal below saved me from my self-induced failure to socialize. This is Nina Marie and I met her through her blog and her "Off the Wall Friday" link up feature. I was so happy to meet someone I 'knew' even if it was only through blogs up to that point.


She was a lot of fun to talk to and we also met another quilting blogger and teacher, Leeanna Paylor. She was fabulously funny and friendly. In fact we've talked over the phone since then. Both have been an encouragement to me in regards to my tongue-tied self. Hey, there's a reason I express myself with fabric and thread. There were so many people I should have talked to, but if it was up to me to start the conversation, most likely I didn't.


Above is Nina's piece, John 4:24 ("God is spirit, and his worshipers must worship in the Spirit and in truth.")


I try to take pictures of the artist statements for each piece I photograph, so I can give credit to the artists. In a few days I'll post Part 2 of my trip to Sacred Threads, which will include more pieces in the show.


One of Nina Marie's great tutorials was about her fabric dying in Solo cups and the freedom in dying more informally while still getting fabulous results. When I saw the above set of lights with red solo cup shades, I had to snap a pic for her!

And then there had to be a bit of fabric shopping! Though I only hit a few shops and was very cautious in what I bought. Below is the color palette for a new quilt I've got in my mind and in my sketchbook. The striped batiks were the inspiration, but the quilt will be done in the solids.


As if a weekend wasn't enough, I'm returning to the show tomorrow with my kids and parents in tow to see the exhibit with a cousin and then hit the Air and Space Museum. Then the following week, I will return again with my aunt!

Since I came home from the show, I have seen photos online of other artists that were there and have really been kicking myself for letting the shyness get the better of me. If you were there and I didn't speak to you it was because I was a total chicken. You might remember me as the young gal with turquoise pants and a nicely contrasting red face! I was probably the youngest artist there, at 42, and the only attention my relative youth got me was an inquiry by one of the volunteers to see if I had any feminine hygiene produces to aid a needful guest! At least I don't look old enough to be judged done with menopause! I'll take it as a complement.

I am quite happy with this year's exhibit. There were some changes from the 2011 show, including a venue change that was for the better. The layout was fabulous, a kind of labyrinth to walk and view the art work. And the 'Artist in Residence', Domonique Ehrmann was very approachable (even for my shy self) and I enjoyed talking to her. I can't wait for the kids to see her 3D quilt and find the animals she has hidden within it!

 This post is linked up at Nina Marie's "Off the Wall Friday" link up. Take a look at what others are doing there.

A New Bag for a Weekend Away to Sacred Threads


I wanted a new purse to take to my weekend get away to Sacred Threads, plus I have a commission to make six purses for Christmas for a friend. She likes the size of my current purse and loved the free motion quilting/embroidery I did on it. Neither one of us liked the strap on it, so I decided to redraft a purse pattern combining  the handles from a huge tote bag I designed and love plus the size and pockets of my current bag.


Since this is the prototype and time was short, I made it in a print and did not do any major quilting on it. Above, I am stitching the bottom which has plenty of stiff Peltex in it to help keep its shape. Those last seams are tricky!


I might make another that keeps the seams on the outside of the bag and bind the edges as I really liked the straighter lines of the bag before I turned it right side out. I fussy cut the outside fabric to make the print symmetrical. I have a serious thing for turquoise and blue right now!


I had originally planned to quilt around the floral shapes but after doing that for the bottom and side pieces, I wanted to do something different. So I used the two main 'vines' in the print to establish a feather spine and feathered most of the bag. So much fun!!!!!

The verdict on the design? Perfect size and shape. Great pockets, one for my tablet and another for papers, plus smaller ones for the cell phone, pens and such. Straps stay on my shoulder well, but are just a bit narrow and I need to adjust the angle of the top seam where each handle joins at the top.

Not bad for the first from a newly designed pattern! What do you think?

BTW, I played around with the layout here. Does the second side bar make my blog look fat cluttered?


Following and Feeds

Googlereader has closed down  and will no longer provide subscribers with a fresh list of blogging goodness.

Apparently Google's Feedburner may not be long for this world either.

I am not an expert when it comes to feed readers as I have gotten out of the habit of using one. Feed readers help streamline the reading of blogs by giving you a list of your followed blogs when they update. This keeps you from checking blogs and seeing that some still haven't posted anything new, for example, since the author was 39 weeks pregnant, 2 years ago. These things happen, and that particular example is one fine excuse for not blogging in a while!

Any who.... It seems Bloglovin' and Feedly are the popular choices for those who have had to move from Google Reader and I have added buttons to the right sidebar to make it easy to add this blog to those readers if you so choose. I've also added a few other ways of following or subscribing to this blog.

I also have had two Feedburner supported links (Subscribe now, and Follow by Email) on the blog for a long time and I see that I have 23 followers via email. If you use those methods to follow this blog, you probably know more than I do how well they are working. If they aren't working well or are being phased out, I urge you to switch your feed to something that will keep you updated when I'm posting something new. I don't want to lose anybody!

In fact I need to set up an account with one of these services myself so I can be more efficient with my time as I 'visit' with each of my fabulous bloggy friends! I love seeing what everyone is up to. Well, not literally everyone, but you know what I mean!

Have you changed readers lately? What have you used in the past and what are you using now? Help a girl out by sharing in the comments.

Quilting Bits and Pieces

Not necessarily fabric bits and pieces, but little bits of quilting news, events, and mishaps.


I'm getting ready to head off to the Sacred Threads Quilt Exhibit this Friday and I thought I'd make a new purse. In fact, I decided to create my own pattern for a smaller purse based on a large bag I designed last year. All was going well and then..... I fused my interfacing to my press cloth.

I swear I checked to make sure it wasn't shiny side up!

I am really looking forward to the Sacred Threads Exhibit! Not only will I see my quilt on display (The first quilt I've ever entered into a show or exhibit.), but it's going to be a nice trip with a fun and fabulous friend. We leave Friday, and come back Sunday. Without kids!

I love my kids, but time away from them is rare and I find when I go away, I come back refreshed and actually missing them. And I hope to spend some time chatting with other quilters and artists and learning from them! Maybe I'll even meet a reader of my blog?

Superior Threads makes some beautiful threads and their site has some fabulous videos to educate us!

Near the end of last year, I asked 3 fabulous ladies to be my "advisers" to help mentor me and keep me on track with my own self-appointed goals and deadlines. And I am the one who has consistently been late with my reporting to them. Maybe I need the local one to give me a swift kick in the rear!

The marvelous and multi-talented Leslie at Marveles Art Studio has been doing some seriously gorgeous quilting lately! Go take a look at some seriously gorgeous feathering and other free motion quilting designs.


Owl in a Cool Tree

I'm working on a commissioned wall hanging for a little boy. His mother bought a tree quilt from me last year for her daughter and wanted a similar tree for her son. She picked the color scheme, and I did the rest. Fun kind of work.


Getting started. The background fabric is a natural linen. I starched the back side heavily to help keep the grain straight. Linen isn't as stable as cotton but I love the look of it.


I'm doing fusible applique with Wonder Under and using my Sizzix die cutter for the leaves. Borrowed a stencil from the kids' art supplies to get a few shapes just right for a little feathered friend in the tree.


Things are coming together pretty easily. Who, whoo's that in the tree? Fun stuff!


Here's the final arrangement of the tree and it's leaves plus Mr. Owl. I need to remove a few extra leaves and then carefully take the paper backing off the shapes so I can fuse it all down. You can bet I'll refer to the above picture to keep everything in the right place!

My goal is to finish the top tomorrow, then I need to work on making myself a new purse for my weekend getaway to the Sacred Threads Exhibit this coming weekend.

I'm linking this post with Nina-Marie's Off The Wall Friday link party. Check it out!

A No-Sew, Just for Fun Project

It's kind of sad to admit that I don't do many sewing projects just for fun to feather my own nest. But last week, I decided I was going to tackle this one somewhat silly project just because I wanted to!


Behold! My ugly, lying, worn out bathroom scale.


 Stripped of the curling black mat material.


A cheerful fabric topped with the new, nifty, and easy to apply iron-on vinyl!


Wrapped around a piece of Peltex cut to shape. Peltex is an incredibly stiff interfacing.


A spritz of permanent spray adhesive (not the quilt basting variety) and I now have a pretty scale that will at least be easy on the eyes while it tells me something ugly!

And it felt so good to take on a project and finish it completely! That three finishes for me in the past week; Poured Out 2 has shipped off to the Sacred Threads Exhibit, Sherwood Forest Love has been given to its intended recipient, and this flowery scale.

Now I'm working on a commissioned piece that should be pretty easy to finish off quickly. I think I'm going to start focusing more on how good it feels to finish a project. Maybe it will have a more positive effect than to keep thinking of the huge pile of projects I need to tackle.

How about you? Do you struggle to finish projects or do you finish one before starting a new one?

Blogger and Drop Down Coupon links

It seems I've got some issues on the blog with some drop-down coup advertising that I did not install or approve of. Nor do I want these links. My brain is mush right now so I am going to bed and will try to remove these unauthorized links tomorrow. I do put a few selected affiliate links on my blog from time to time, but they are carefully chosen by me. These new links are somewhat random and I will do my best to get them gone. Should you have any experience with this on your own site and can give me some help with how to get rid of them, I would appreciate it. The uninstall direction from the drop down coupon site don't seem to help. So sorry folks!  

Update! Seems it's not a problem with my blog, but some malware on my computer. You probably aren't seeing what I'm seeing.

Update to the Update! Phew! It seems I have gotten rid of the blasted thing. All is well. And now I will go to sleep.

Playing with Bigger Machines- Sit Down Long Arm and New Janome 8200

I went to my favorite quilt shop in my area in May to play with a new machine, but was sworn to secrecy until June and the post just didn't get written. Oops!


They were smart and had prepared for folks who wanted to try the machine; Machinger gloves and small quilt sandwiches were at the ready. So I had a fine time stitching away!


 Fun, free motion, free form feathers? Check!


But look at that foot.....something looks different.....have I gone long arm? Nope. Or not exactly.


This is the new Gammill Charm! A sit-down long arm. Now, the reason I was sworn to secrecy was because they didn't have all the programming set up when I tried it. Turns out this shop is part of the Beta-testers for this brand new machine and they had yet to get the final software installed that helped control the machine. So I ended up stitching without any speed control other than my foot on the foot pedal. This thing has some serious get-up-and-go! Once I figured out how softly to press on the pedal, I did fine.

What did I think of the machine? I really need to go back now that they've got the programming installed. I believe that the features include speed control, maybe even some sort of stitch regulation, and some sort of on-screen pantograph abilities.  It has a laser pointer on it for something but I don't know what. So that colors the usefulness of the review. It was great fun to take it for a spin!

But: I really liked the table it comes with! Very sturdy, smooth and a good size. This machine has so much power that it has potential for a lot of vibration in a table less sturdy. It also has a super huge Supreme Slider to make it absolutely smooth for a good-sized area. You can see it in the photo above.

 I love that it sits in the same orientation as a domestic machine. I have tried machines that sit perpendicular to me and found it disorienting. Plus, that puts the motor housing directly behind the needle so when sewing a long straight line, the quilt will bunch up right there.

Things I don't like: it shouldn't surprise me that coming from a long arm company that it is expensive and a bit over-kill for what it is. If you can afford it, it looks to be a fabulous machine and I have no doubt that it is well built. You would have no trouble quilting large quilts with this machine.

A New Janome

I also tried out a new Janome this week and I'm putting it on my wish list! To be clear, there's nothing wrong with my wonderful Janome 6600. But the new Janome 8200 has 2 more inches of  throat which means more free motion quilting fun on larger quilts! They bill it as a simpler version of their high-end models at a mid-range price and I agree. It still has all the features of the 6600 plus a few more stitches and other features.

It also has better lighting at the needle. The 6600 has a light right above the needle threading lever, which casts quite the shadow. There are more lights on the 8200.

Another feature I like is the accufeed system (a fancy name for built-in-walking foot) has been modified to be more removable. This seems to almost be a step backward from built in walking foot back to a walking foot attachment. But not exactly. The walking foot still attaches better and is more integrated than the usual walking foot attachment, but the important part is when it is removed, there's better clearance around the presser foot area. I find with my 6600 I sometimes get my basting pins or project hung up on the remaining accufeed mechanism when free motion quilting.

Prices

I know the dealers aren't supposed to post prices online for these newer machines and my relationship with them is important to me, so I won't give exact prices, plus machines sometimes come with different accessory packages. Let's just say that the Janome 8200 is priced about $500-1000 more than the 6600 (mine was $1700 or so) and the Gammill Charm will cost about 3-5 times the price of the Janomes.

I am toying with the idea of selling my 6600 to get the 8200, but I will have to wait a bit before I can do that. As I said, the 6600 is a great machine and does what I want tit to do which is plenty of free motion quilting, plus sewing, but if the 8200 was available when I bought the 6600, I would have gotten it.

If I thought I could get paid steadily for quilting for others, especially for doing custom quilting as opposed to edge-to-edge designs, I would think of getting the Charm or the lower-priced APQS version. But otherwise, it won't fit in our budget.

Funny Aside

I noticed the Gammill dealer (Thread Runs Through It) had posted a pic on their facebook page of this machine at a quilt show: Guess who's quilted feather was sitting on the table? They are great folks who a doing a great job of doing what they do!


Hanging Sleeve How-To


See how there is extra fabric to allow room for the rod?
 I've been putting hanging sleeves on a few projects and thought I'd share a little about how I do it. First off, I hate adding the hanging sleeve, but since I mostly make wall quilts, I have to make the best of it.

Cut a length of fabric the width of your finished project, the size for the other dimension of the sleeve depends on the size of the rod to be used or if the work with be shown somewhere, depending on the directions of the show. For a small piece a sleeve cut the width of the project by 4 to 6 inches is plenty. For a four inch sleeve as required by the Sacred Threads Exhibit for my Poured Out 2 Quilt, I cut it at 10.5 inches. That leaves plenty of room to make a  D shape on the sleeve to allow for the bulk of the hanging rod.

Hem the sleeve with the wrong side showing on the right side!
Hem the short sides by folding the wrong side out! I use a double fold hem about 1/2 inch wide. Folding the hem to the right side keeps the hanging rod from catching on the hem. Fold the sleeve lengthwise, making sure to have the 'wrong' side of the hem out, and stitch the raw edges together using a 1/2 inch seam allowance.

Then set your machine to a long basting stitch and stitch along the folded side anywhere from 1/4 inch to maybe even an inch, depending on the rod to be used. After the sleeve is hand stitched on, the basting will be removed, giving you the D shape, allowing for the rod. This helps your quilt hang straight instead of bulging out around the rod.

The basted fold.
Now comes the part that drives me crazy! Pressing the tube of the hanging sleeve so it is nice and flat but also even. If your sleeve is wonky or crooked, it will cause the quilt to hang crooked. My trick is to treat the seam of the sleeve along with the basted fold as a set of nesting seams, like when piecing.

Nesting the seams for pressing the sleeve

In the picture above, the seam with the long raw edges of the sleeve is finger pressed to one side (under my finger) while the basted fold is pushed to the other side. Once you feel those seams are butted up against each other, press the tube. This should place the actual seam of the tube right in the middle.


Check to see if the fold is right on the line of stitching or not. In the above pic, the fold has gone astray. The below pic shows how the fold falls right on the stitching.


Once everything is lined up straight and pressed flat, open up the seam allowance to reduce the bulk.


Make sure the basted fold faces away from the quilt!


Then align the sleeve an even distance from the top edge of the quilt. To keep the sleeve from showing above the top quilt edge, make sure it is at least the same width away from the edge as the width of the basted fold. For example, if the basting is half an inch from the fold, stitch the sleeve at least half an inch from the edge of the quilt.


You can pin the sleeve on, or use the Elmer's Washable glue, or I've even seen a video of Ricky Tims using the free motion foot to baste the sleeve on until it is all stitched. I usually pin it. Hand stitch the sleeve securely and evenly on the back of the quilt along the 2 long sides and then also stitch the short sides; but only the part touching the quilt. Then remove the basting of the fold.


And there you are! Ready for hanging.


I am so glad I got the sleeve done on this quilt as the intended recipient was at church the following Sunday and I was able to give it to her. I think she was thrilled!