A Ruler Work Sampler: The Quilting

Hurrah! I'm quilting again. So happy to start quilting this project. It's a true sampler; the piecing and the quilting. I'm doing a bunch of different designs using rulers to guide my free motion quilting.

a ruler work sampler
Almost all of this quilting was done using a Janome Ruler Foot combo and rulers on my domestic sewing machine.

 I've shared that the piecing was a challenge for me as I am really all about the quilting and I don't normally do a lot of piecing. But I know that most quilters do more piecing than I do so I wanted to make a piece that would be more applicable to typical quilts and show a variety of ruler-based designs.


I was pleasantly pleased with my piecing! Maybe all the quilting blogs I've been reading has rubbed off on me. It's not perfect and there was quite a bit of unsewing on this project, but overall, it turned out pretty well.


I printed out a black and white photo of the top in order to develop a quilting plan. I printed a couple of copies because I knew I'd have several ideas to draw out. A white mechanical chalk fabric pencil works great for marking the dark patches.


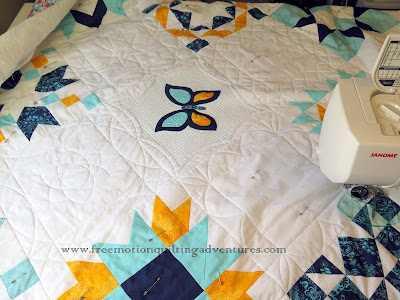
A lot of the basic quilting will eventually have detailed background quilting quilting like these circle areas, but first I will finish the basic quilting. The four setting squares are stitched with a faux sashing, turning the 12 inch blocks into 8 inch blocks with 2 inch sashings.


I enjoyed using this little ruler in the faux sashing of this setting block. I have several new rulers I'm trying out and some new non-slip product for the back of my rulers. I don't find that my method of holding the rulers (with my gloved fingers) doesn't allow a lot of slipping, but I'm liking these clear dots for a little extra help.


I'll be doing a giveaway on this product later this week. It's not a new product, but new to me and since I bought and extra pack and they're easy to mail, I thought a give away would be fun.

With any luck and a lot of diligence, I will show the finished product along with the giveaway post. So excited about this quilt!

A Pieced Sampler

Squee! I've got my sampler top all done. It may not seem like a big deal, but if you've ever looked at my quilting (or someone better) and thought, "Gee, I don't think I can do that" that's exactly how I feel when it comes to piecing. Especially if it involves a lot of points!


Really, I had planned to do a border or two, but I just don't have time. Done is better than perfect.

Now to piece the back, baste, and get to quilting!

A Question for You

I have a question for YOU today and need help with an answer:

Do any of you use a Janome 12000 for free motion quilting AND use the convertible free motion foot set with it? It's my understanding that it has a different free motion setting that uses a different foot, but that the free motion foot set can be used with it too. I will be teaching a class on ruler work where a 12000 is available for me to demo on. They've not used the ruler foot and convertible set on it before.

I'm pretty sure I've had comments where people said they were using the convertible FMQ foot set and the ruler toe. If you are using this machine and feet, are there any special settings to set on the machine?


Here's what I'm working on today: a little applique for the center of my sampler project. Using freezer paper and a bunch of starch to prep the edges.


I'm stitching my butterfly down with YLI's monofilament polyester and a teeny tiny blanket stitch.


I hope somebody can help me with my question and all of you are enjoying the creativity of quilting!

Back to Piecing

We returned from our family reunion trip this past Thursday and aside from some extra laundry, all is back to normal. We had a great time! My husband was able to come this year and our kids were old enough that I wasn't completely exhausted from the mother hen routine. I even got to snuggle my cousin's 5 week-old daughter. This was the first reunion in ages where there was a little baby there and I wasn't completely tied up with my own babies.


We took the kids swimming and for a boat ride into a cave. The cave was blissfully cool!


I'm working on my sampler quilt again and while I thought this block would be the last pieced block, I'm not entirely sure. The center block will be an applique block. I haven't quite decided what though. Maybe a butterfly.


 I did a lot of unsewing and resewing on this block. After I took this picture, I see another spot that needs to be fixed. I always thought that the accurate cutting, preciseness, and attention to alignment of the patches was what turned this "free-spirit" off of piecing, but maybe it's just that the bit of perfectionism in me can't tolerate my mistakes.


But I'm sticking with this project and refusing to be defeated by my points; and there are a lot of them! I played around with the layout and swapped a few blocks around, but there's still one that I don't like.


I'm going to work on the applique block now, before I start a replacement block. In the meantime, look at the above layout and tell me if you think one of these blocks just doesn't work for you. For clarity purposes, let's number them 1-8 starting with the top left block and going clockwise.

Quilts of Spring Mill Village

I am at our annual family reunion this week and I thought I'd share some quilts from the pioneer village in the park. (I am writing this post on my phone during a well-earned break in my room while hubby and the kids are off doing something.


All the tables in the lodge restaurant have skinny little table runners on them! I'm not sure if they were made locally or are something that is mass produced. Our reunion moves around a little from year to year, but Spring Mill near Marshall Indiana is one of our favorites.

But the star of Spring Mill State Park is this pioneer village. Part of the buildings are original to the site and others were moved to the area to preserve them. The time period of the village is from the early 1800's to about 1860.


The water powered grist mill still works and is run every hour on the hour during the park's open hours. (My husband and youngest son are the folks in the picture.) The white that you can see above the water wheel is the water- it was running when I took this.


Several of the cabins have beautiful hand made quilts. I say cabin loosely here as the home pictured above was bigger than my cottage. Above is what I am sure is a newer quilt on an antique all-wooden frame.


Look at this appliqued baby quilt in such a beautiful cradle.


This may have been a rustic log cabin, but it is big and furnished with some gorgeous pieces!


Look at this pineapple quilt! This was in  the "nursery" across from the mill office and residence. It had wall paper over lath and plaster walls.


This is a trundle bed in the same building. On the right is a woven coverlet. Several of the cabins have looms and spinning wheels.


After we walked around the village, it was time to cool off in the creek. It wasn't too hot, but it was very humid! Coming from Virginia, that says a lot. But the creek water was numbingly cold. It didn't slow the kids down a bit. I dabbled my toes in it.

I hope you enjoyed this post; a little different from my usual posts, but I wanted to share these quilts and this park with you until I can get back home to the 'regularly scheduled program'!

Free Motion Quilting: A Weekend Ramble

I'm busy with all this piecing and I really want to do some quilting! I think you all would like to see some too! Times like these I wish I had a dedicated machine just for FMQ so I didn't have to switch out feet and set ups. I'm gonna share some older pics of my quilting today after a word about this piecing.


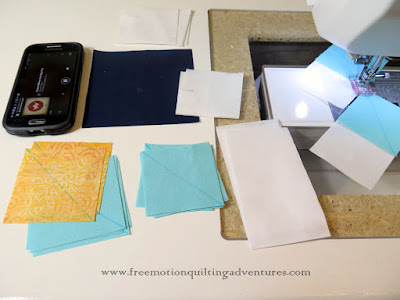
I have to say I am enjoying this piecing more than I ever have in the past and it's even more complicated piecing than I've ever done. There are several flying geese units in these blocks and they are done using the 'sew a square to the corner of a rectangle and trim' method, so I've got a stack of little triangles left over. Today I sewed a couple together and found that they'll trim up nicely into 1-1/2 inch squares. I'll have to make something out of them!


A few years ago, if you asked if I'd be stitching something so small, I would have laughed. I guess that's a sign of growth as a quilter and I hope that you are seeing some signs of similar growth when it comes to free motion quilting. It only gets better by doing it.

The pictures that follow are pretty much in chronological order.

A very early piece I did, just drawing with my needle.

A pillow I made for a friend whose husband died from cancer.


Feathered fun!

My first "Poured Out" quilt

Detail: every block was quilted differently and little things hidden in the quilting. Do you see the fishing boat?

A flamingo for a flamingo loving friend.

A purse panel

Wedding gift for a couple who had a Robin Hood themed shower.

My first quilting for hire on another's top.


Another shot.

A post card I stitched and gave away on the blog a few years ago

Look at the dimension on this quilting!

Feathers on "Poured Out 2"

Trying out a friend's longarm. Think I'll stick to moving the quilt.

My favorite quilting so far and it was on a commissioned piece.

Playing with rulers- one of my favorite techniques!

I hope you enjoyed seeing these quilts. I sure enjoyed making them. Well, all but that big customer quilt with the applique'd flowers. That was a 72x72 inch quilt with a heavy thick batting. It was a beast and I was so afraid they wouldn't like it.

I'm heading out Monday for a family reunion and I hope to get back to quilting when we return. Enjoy the weekend!

Ruler Work Sampler: Piecing Continues

Six blocks down and at least 3 to go. This exercise in piecing is humbling. I am treating it as a much needed exercise in following directions. My kids don't need to know it, but I've always struggled with following directions. I like to do it my own way! This extends from sewing, to cooking, to quite a few other areas.

OK, I did change the colors here and added the orange.


 When going through the tutorials, I can see other ways to piece the blocks, especially wanting to make 4 patches with strips sets and make the half square triangles by sewing strips and then cutting them diagonally into squares. But I'm following the instructions to the letter. (Except for the order of sewing in a few cases to help me chain piece and press more efficiently and a few typos.) I figure it's good for me. A little more time as a student to gain better insight when being a teacher.

Sometimes I piece while singing along with my favorite tunes on my phone.

I'm also doing a lot of the piecing at night, when I'm tired. This has led to a few mistakes. Like the time I sewed down the marked line of 8 squares instead of 1/4 inch away on either side. So I then stitched the 1/4 inch lines and then cut down that line of stitching down the middle.

Whoops! At least I didn't need to rip it out.
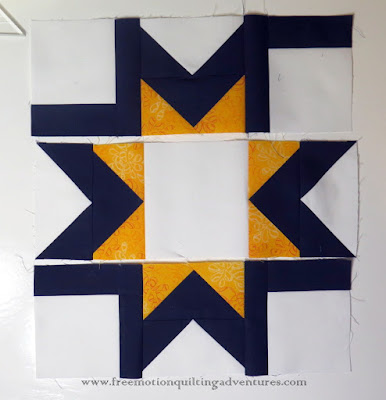
Last night I was working on this block below, and as I got ready to sew the 3 units into the final block, I realized something wasn't right. Sigh....

So far, this is my un-favorite block. Too much contrast with the navy and no pretty turquoise.

Of course there was some seam ripping and resewing when points floated or were stitched over, and corners where points didn't meet up well enough. Though there wasn't as much of that as I had expected.
Six blocks on the design wall. I think they'll be set on point.

I am dying to start quilting on this!

Slip Sliding Away...or Not: Free Motion Quilting Tips

It's a beautiful, not too hot, fairly humid day in Virginia (US). I've got a few extra kids over and one of my kids is at my mother's. Everybody is playing outside and I thought I'd knock out a quick design for a class I'm developing. Since I've been piecing on my machine, I dropped the feed dogs and switched out the foot for my free motion quilting foot set (with the ruler foot on it).

free motion quilting tips

I started quilting and right away I noticed that the motion of my quilting was difficult; jerky and not smooth. I felt tense too. What in the world was the problem?

combining ruler work and free motion designs


I neglected to use my Supreme Slider ! It was just a small sample and I figured there wouldn't be much drag, but I was wrong. The slider smooths out the bed of machine, especially where the machine joins the insert for my table. This would be similar to where a machine meets the edge of an extension table too.


And that humidity I mentioned earlier? It made everything a smidge tacky. So I had to use more pressure to move the quilt, which emphasized the bumps of the cracks between machine and table. I toughed it out since it was just a sample, but it was a reminder of how much that smooth slick surface aids my free motion quilting. I had my Machingers on as I always do, but the "grip and slip" work together and the slick was lacking.

If you find that free motion quilting makes your shoulders hurt, your hands cramp, or your quilting is herky-jerky, take another look at your surface. Is it smooth, flat, big enough to keep the quilt from hanging off the edges? If you don't have a table that your machine can sit flush into, you might want to consider these two options: SewEzi Portable Table and my DIY Sewing Table.

Also look to see if a Supreme Slider, Sew Slip mat, a teflon baking sheet, or even a polish or silicone spray might help. If you use the puddle method of stuffing your quilt under the machine like I do, your don't need to have a gigantic area covered my such slick covers or coatings, just the area under your hands and immediately around the machine bed. Some machine beds are smoother and flatter than others. That's something I miss about my Janome 6600. I love my 8200, but the bed has some ridges that really need that Supreme Slider.

Then There Were Three

I got my third block pieced yesterday and it's probably the least perfect one of the bunch but it's good enough. Probably would pass the 5 feet away test. (Can you see it from 5 feet away?) I did a bunch of ripping and re-sewing on this one, but it made barely any improvement. Several funky seams to match up and I don't have the patience to line them up precisely enough I guess.

This spot wasn't too hard to line up, but the other seam in the unit was! There was some bulk in the seams too, so I pressed the top seam open which made it harder to  line them up.

But I love this block and the white center will give me a great spot for ruler work. I'm starting to think ahead to how I want to put the blocks together. I think I'll use sashing and corner stones. I'm also thinking I might do the blocks on point, though this one would look better set straight. I'd like to have the setting triangles open for more ruler work. Maybe I want to alternate the blocks with plain ones for even more room for fun quilting.

Another block from Natalia Bonner's tutorials.

I'm also trying to decide if I want to throw a little more color into the quilt. Maybe some orange. Orange isn't really a color I use (nor red) but I've got a nice marmalade color print that would look good with the turquoise. I do love the turquoise and navy combination with the white!


I used my Clear View Quilting foot without the guide for the flying geese units and it was so much better than using my regular sewing feet. I do wish the straight stitch needle plate for my Janome 8200 had a hole for this right side where the 1/4 inch piecing setting puts the needle. I used my 'leader' to keep everything from getting sucked into the 9mm wide opening in the regular stitch plate and had no issues, but you'd think that they's make a single hole to line up for the 1/4 inch foot! My mind is wandering towards the drill....