Showing posts with label machine quilting. Show all posts

Add Quilting to a Machine Embroidered Block

 Someone was asking about how to add quilting to a quilt project that is machine embroidered applique on a Janome 15000 group and I wanted to share what I had done in one of our Kimberbell Clubs at Sew Simple of Lynchburg, home of AmyQuilts.com so I'm posting it here.

This would be ideal for a project that goes together in quilt-as-you-go style, so that the quilting can be added as you embroider each block. While it's not perfect, it requires no digitizing skills and you can do this with the Janome 15000 and Janome Skyline S9.


This takes 2 of the fabulous Janome apps for iPad. Sadly, not available on android. First you can use AcuSketch to take a photo of the embroidered block in the hoop. Make sure to select a canvas size that is equal to the hoop you are using. Doodle a nice meander, loop de loop, stipple, whatever you can manage. Keeping it real alert: I doodled many times to make it nice and smooth. You can use stencils, rulers, etc. to help you draw.


Send the design to your machine over the wifi and then open the AcuSetter app to pull the design from the machine and use the app to position the quilting stitches. Note: use the Tool section to slightly resize as needed.


Sorry, I don't recall why my block is upside down. I love the accuracy that the AcuSetter app gives!


Then stitch your quilting design over the rest of your embroidered block. It should be noted that the block shown was embroidered in two separate hoopings (Snowman and then the quotes) and then assembled with the pinwheel block as instructed. THEN I hooped the entire block for the quilting.

Love these machines!


PS While the AmyQuilts Embroidery Clubhouse is taking a little break, this is the kind of thing I cover in more detail there. The AmyQuilts Sewing Clubhouse is open to owners of these higher end Janomes to master the use of your machine with greater confidence and creativity.

Amy's Quilting Juggling Act

Hard on the heels of teaching at the Janome Education Summit, I've been dabbling in quite a few quilty projects, though only a few or them involved quilting with rulers or ruler work. Click on the above link to read about the summit and links from other fabulous participants.


Janome passed along some photos from the event, so I thought I'd share them with you too. The Summit was my biggest class yet in teaching free motion quilting with rulers. Thank goodness we all had the same machine (Janome 9400), ruler foot and the Janome Ruler Work Kit for our rulers.  That made it a lot easier even though some of our participants hadn't done free motion quilting before.


Here's a great shot of Sarah Ann Smith! It was an honor to have her in class as she's been an inspiration over the years. She totally did her own thing with the project and gave a fabulous write up on the quilting with rulers class segment on her blog.


Have you seen the Jelly Roll Rug yet? Just had to make one of these fun things. I used a jelly roll and two rolls of pre-cut batting strips, but it's an excellent project for using up scraps of batting.


The trick to getting a nice flat rug instead of a ruffled thing my husband said looked like a swimming flounder is to make sure to sew on a large flat surface (pattern gives a suggestion how to set up machine next to a table if you don't have a machine cabinet) and to ease the fabric around the curves. I loved using my Horn cabinet for this.


As soon as I returned from the Summit, I had to get cracking on my shop's Row by Row pattern and project. Row by Row (aka rxr) is like a giant shop hop, all across North America (possibly elsewhere? Unsure) where travelling quilters collect either free patterns or buy the kit from shops. If you are the first to show a finished "row" quilt with 8 patterns from row shops, to a participating shop, you will win a bunch of fabric. It's something really fun to add during your summer travels.


My "row" is actually an 18 inch block as they are allowing different pattern sizes this year. I played with my machine's decorative stitches and a couple of different weights of Aurifil thread on it. I'll write up more about Row by Row closer to the launch date of June 21st. 


I'm really excited about this fabric line by Hope Yoder that we've got in the shop, especially the panel. I decided to order two more bolts of the panel in the thoughts that this might be the basis of my first either Quilt-along, or a new online class. I've got kits for this quilt featuring the panel in the shop right now, but I'll let you know more about what I want to do with it soon. Need to get the additional panels in before I launch something online.


Speaking of hosting a Quilt-along or a new online class, I'm working on two big changes for you  and my business/teaching.

Ever since we bought our bricks and mortar shop, Sew Simple of Lynchburg, I've been neglecting this blog and my video making. I've been scattered in several places online too and it's been quite a juggling act. To make up for my lack of blogging and video making, I've been shooting more live Facebook videos and they certainly helped me feel more connected to you in my online audience, but I've really been spread thin. Live videos are fun and easy to do, but lacking when it comes to organized instruction.

I finally reached out to a pair of mentors of mine and asked them what to do with my websites. I was afraid to hear how bad my sites were as I'm the one who set them all up, so they're a bit amateurish, though fit for my tiny budget. Their advice? It was that I need to condense the various sites into one site if possible and shorten the url. If you've ever heard me struggle in a video to say "I'm Amy from Amy's Free Motion Quilting Adventures," you know they're right!

So....I'll be transitioning everything over to AmyQuilts.com!


I'm excited about the change though it will take a lot of work and a bit of time to get everything moved. If you follow the blog via a feed reader like Bloglovin' or something else, I'll let you know when the blog makes the switch and you'll want to change your settings to the new blog. This blog will stay online, but I won't be adding to it once I make the switch.

Lastly, I'm looking at doing some of my own online classes! These will fit somewhere between the highly scripted classes I did with Craftsy and my very casual, informal Facebook live videos, or even my YouTube videos. This will give me better control over the content I teach and how I teach it. Some classes will be free, others will be paid. All will be full of great information and taught in my laid-back style.

I'm very excited about these changes and I hope you will be too! Let me know your thought in the comments.

A New Janome Ruler Foot

Janome was the first sewing machine brand to have a ruler foot, and while it was originally intended for use on a frame mounted machine, quilters far and wide began using this combination of feet on regular, stationary sewing machines.

As I've shared my quilting adventures with ruler work here for over 7 years, so many people have enjoyed the technique, whether on a Janome or a compatible machine.

In the last few years, machines have been created with an automatic presser foot mechanism which is super duper awesome for sewing, but Janome did not approve of using the Janome ruler foot combination with these machines. Plenty of determined quilters used it anyway, though it wasn't approved, nor ideal.

Just last year I was in Cincinnati Ohio at a Janome training when they introduced the Janome 9400, which has an automatic presser foot lifter. I was talking to my Janome rep about the ruler foot when Shin Yamamoto, President and CEO of Janome America came over and asked what I thought of the new machine. I explained that I thought it was fabulous for sewing but because I loved to do ruler work and the Convertible Free Motion Foot set wasn't approved for the model, I wanted to see a ruler foot for these machines.


Fast forward to earlier this week and I'm in the same hotel conference room and Janome announced than not only was there a new version of the Memory Craft 15000, called the Quilt Maker 15000 that had a ruler foot and a ruler work setting, but there was also to be a free upgrade to previous versions of the 15000 that would make them compatible to the new ruler foot and several other new feet!

Janome Quilt Maker 15000 ruler foot


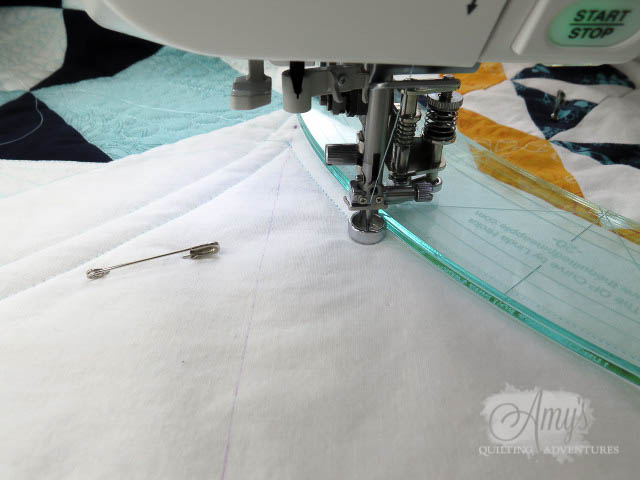
 The new foot and ruler work menu settings make quilting with rulers substantially easier to set up.

Janome Quilt Maker 15000


It gets even better! Janome is working on updates for the other Janome machines that have the auto presser foot lift (MC14000, 9400, S7, and S9). The update is a free one performed by your dealer, the new feet will not be free. (The update will also have a replacement part for the needle threader on the older 15000 versions, to make it work better.)

Ruler work was all the talk during our dealer training. Janome is motivated to get these new upgrades and feet out asap!

The new feet (ruler foot and a few others) aren’t quite available to dealers yet, other than those that come with the new 15000, which I have sitting in my studio! I was told that the update for the 9400 should be ready in a few months.

I’ll keep everybody updated as I can.


Meanwhile, I'll be playing with my new 15000. I used it for the very first time while demonstrating ruler work to students in my Quilting with Rulers class here in the shop. It was fabulous! No more worrying to remember to put the foot down before putting down the needle or making sure the needle is up before raising the foot. It's got a ton of other nifty features, but I'll save that for my shop's blog.


The foot is super! It's smooth, rounded on the bottom and has a good sized divot at the front to better see at the needle. It attaches directly to the presser foot bar, so there's no spring part in the way. You adjust its height through the ruler work menu. This gives it great visibility.

This will likely be the machine you see me use in my tutorials from now on, unless I'm doing a test of a new low shank ruler. This means my beloved MC8200 is for sale as a used machine. I'm not sure what the protocol is for a dealer selling a used machine and listing the price online so if you're somewhat local and looking for a fabulous machine for quilting with 11 inches to the right of the needle, you can call the store (434-239-6708). Not that we couldn't ship this machine where ever, but I feel weird about selling a machine far enough away that we couldn't support it well as the dealer. Having a local dealer is sooooo important. (BTW, we are also selling a new sewing/embroidery machine, the MC14000 at a smoking hot price that I can't list online, as it's being replaced by the 15000.)

I am so happy to see that Janome has listened to its dealers and customers and are making these changes so these higher-end machines also have a great ruler foot. I was blessed enough to have an opportunity to remind Shin that I had asked for this very thing in the same spot last year and how happy I was to see it and thanked him.

If you have a Janome without the auto presser foot lift, the new foot isn't for you. Stick the the convertible set and ruler foot combination.

Quilt on!

Amy's Top Tips for Quilting with Rulers on a Sewing Machine

Whether it's a sewing machine, domestic machine, or sit-down long arm, if you quilt by pushing your quilt instead of moving a machine, I've got some great tips for using rulers to guide your free motion quilting.

ruler work quilting using rulersto quilt

Ruler work is a great technique for a huge range of skill levels. If you are comfortable moving your quilt under your machine, you can do ruler work.

If you're a beginner, using rulers helps you figure out the all-important "Where do I go next?" issue. Just follow the ruler. Specialty rulers can give you design options that you might not be able to create on your own.

create motifs with rulers with ruler work quilting

If you're more experienced with free motion quilting, ruler work can help you develop a framework that really helps your free motion quilting shine.

These tips are garnered from over 5 years of doing ruler work on my Janome machines. I've had a good long time to try all kinds of rulers and see what works and what doesn't.

So let's get to my top tips for quilting with rulers:

  • First of all, it really is easier than you may think! Try it and practice.
  • Anything that helps you move the quilt smoothly helps with ruler work. Having the machine flush with a large, smooth surface is the best. 
  • Arrange big quilts in a series of peaks and valleys around and under the machine. You only need it flat where you are quilting and under the ruler. The folds of the peaks and valleys act as hinges to move just the area of the quilt you are working on while letting the bulk of the quilt stay stationary. This reduces the weight of what you need to move.

  • DON'T do ruler work without a ruler foot! At best, you'll be extra tense trying to make sure the ruler doesn't hop over or under the foot. At worst, you'll break a needle and throw the machine out of time. Janome was the first with a ruler foot (even if I had to convince them that it could be used on a stationary machine), followed by the Westalee foot, plus a few others,  Bernina now has its official ruler foot for its newer machines and I recently heard (9/14/17) that Babylock is releasing their own ruler foot.
  • Make sure the ruler foot is low enough on the quilt for good stitch formation without causing drag on your project. You will likely need to change the foot height for different thickness of projects.
  • Wear quilting gloves! Drop your finger tips over the edge of the ruler and the grip of the gloves will help you lock the ruler in place while you move your project at the same time.
  • Don't shove a too thick ruler under the presser foot bar behind the foot, which is mainly an issue on low shank machines.
Westalee ruler foot

  • Given the above tip, thicker rulers are easier to control. They feel better in the hand and have more of an edge to grasp with your finger tips.
  • Handles and other grips can be handy. Some grips may be too tall for domestic machines though.
  • Use a non-slip grip product on your rulers. There are several types, but my favorite are the round silicone ones I sell in my shop. I still say the gloves are more helpful than products on the ruler, but they do help.
  • Don't press too hard on the ruler. Not only will it make it harder to move your quilt smoothly, but it will likely cause the ruler to slip. Trap the ruler in your gloved finger tips instead.
  • Basic rulers are easier to manage than specialty shapes. The more changes in direction, the harder to keep the foot along the edge and keep the pressure even to keep the ruler from slipping. For example, repeating the curve of a half circle is easier to manage than a series of clamshell shapes and results in the same design. Costs less too.
  • Speaking of rulers; you can get a huge range of design options with a good straight ruler and some curves in a range of sizes. My second class on ruler work is all about making great designs with basic rulers. Take the first one before the second, unless you've already begun to do ruler work. See link in sidebar.
  • While one of the advantages of using rulers is to make great shapes without marking your quilt, sometimes you need to mark registration lines. Mark 'em if you need to.
using rulers for ruler work quilting
  • Ruler work can give impressive, precise results, but can also be tediously slow. This is especially true for specialty templates made to mimic free motion designs. Some quilts need one but maybe not the other.
  • Related to the above tip; don't let ruler use keep you from learning and improving in free hand free motion designs. They both work beautifully together.
  • Want to learn more about using rulers to guide your free motion quilting? See my classes on Craftsy. See link in sidebar.
  • Have questions regarding specific rulers or a ruler foot for your machine? Contact me through my website and I can answer those questions and make sure you get what you need.

If you found this post or my previous posts on ruler work useful, pin it or pass it along. After promoting and teaching quilting with rulers on sewing machines for so long, it's getting a lot of attention these days by some real big players in the quilting industry and I'd like to not fade into obscurity. It's a fabulous technique and I hope you will give it a try!


There are affiliate links on this site. They help me continue to share great tips with you.

Quilting with Rulers: Ruler Foot Issues with Auto-Lift Presser Feet

Hello dear readers and quilting friends, I think I and my kids are recovering from our winter cold, flu, plague, pink eye (yes, pink eye. Thanks kids.) mess. I figure I better post something here on my slightly neglected blog before y'all forget about me.

You know how passionate I am for free motion quilting with rulers. So when I heard that Janome Canada did not recommend the ruler foot be used on the Janome S7, MC12000, and MC15000 I wanted to figure out why. I'm pretty sure I have sold the Janome ruler foot combination to owners of these machines and haven't had anyone come back with problems, so what was going on?

Since I work in a Janome dealership, I had access to the S7 and shot a video with my new iPad mini. The mini made editing my video a lot easier than I have been doing it before, so hopefully I will do more videos as soon as I get a camera mount for it.


Watch the video first, but the main issue is the ease of which the presser foot can be raised because these machines have an automatic/electronic presser foot lifter system. It's still an aspect of the lack of clearance between the top of the thick edge of the ruler foot and the bottom of the needle clamp. As always, with any ruler foot, make sure the foot is down when the needle is down and conversely, don't raise the foot when the needle is down.

With this electric lift, it's very easy to accidentally fail to follow this cardinal rule of ruler foot use. Janome Canada says they will not cover any damage to these machines (S7, 12000, and 15000) if you use the ruler foot on it. (I haven't heard anything from Janome America.) I believe the damage would be that of throwing the machine out of time, but I am not entirely certain. This isn't a huge issue to fix, but we don't want to take the machine to the shop.

I think it's doable to use the ruler foot with these machines but that's a risk you've got to decide to take for yourself. I wouldn't want you to do anything to needlessly risk your machine.

My ruler work blog linky party is still open and we've had some incredible work shared through it, so go visit the participants and if you've got a post to share on ruler work, now's the time to do it!

Free Motion Quilting Troubleshooting: Bad Bobbin

When it comes to free motion quilting, there's a ton of variables to address before you get great results. Once you've mastered the basics of moving the quilt, hand speed, tension, and designs you might feel like you're good to go. That's when it can get a bit mysterious.

You've been having great results and then something happens. Check the threading, change the needle, tweak the tension. Most of the time it will straighten out. But occasionally you will be beset with a perplexing intermittent problem. Perfect stitches for good long run followed by 6 or so tangled stitches and then everything is fine again.

A tangled loop of top thread on the back of my quilt.

Check all the typical variables but it keeps happening. It could be a burr in the needle plate that only hits threads when the quilt moves a certain direction. Maybe a stray thread in the thread path. Maybe the quilt is hanging up on something. Sometimes it's a run of bad thread. It can be very perplexing.

For me, it can be a poorly wound bobbin. That's what I want to focus on in this post today.


Sad to say, it is usually operator error when it comes to my bobbins. I get in a rush and don't pay attention. That's what happened to me recently. Now, I only have Janome bobbins here. That's not always the case with a lot of sewists. We get a lot of machines into the shop that are loaded with very much the wrong bobbin. That can cause a bunch of trouble that is easily fixed. Check your bobbins.


The poorly wound bobbin above was the result of me being careless and leaving my machine cluttered with extra feet and needles in the path of the bobbin winding thread path. I love the storage on top of the machine, but I wasn't paying attention and the thread was rubbing on the top of a foot that was out of place.

I stripped off that last bit of thread and started sewing. All was well for about 30 minutes, then I heard a little snick sound. I've talked before about learning the sounds your machine makes. Everything looked fine so I kept stitching and listening. Snick. Check the stitching. Fine on the top but there was a tiny nest of thread on the back. Did a little pulling and confirmed it was top thread. That tells me it was a bobbin area issue.


Check the bobbin and found this knot in the middle of my bobbin with thread wrapped around it. I had my suspicions right away but did a strip search anyway. After pulling off several yards of thread, I realized that when I held the tail of the thread while the bobbin was winding, I held it too long and the thread doubled up on itself into this tangle. Then the rest of the bobbin thread covered it up.


There's a new feature on some of the newer Janomes that completely eliminates this operator error. It's a plate that looks like a plastic saw blade that the bobbin sits on as it is wound. You set the bobbin in place, wrap the thread around the bobbin a few times and then tuck the thread between any of the plastic fingers/teeth of the the plate and it cuts off the excess thread and holds the end while the thread is wound. I don't have this lovely feature.

My solution is just to be more mindful when I wind the bobbin! I ought to know it by now, but I forget from time to time in my hurry to wind the thing and get back to quilting. Any snags, knots, and other things that cause the bobbin to go bad, will cause you grief.

In most cases, a poor bobbin will give you tension issues. In this case, the knot was keeping the thread from unwinding until it was tugged enough by the top thread, which would cause the top thread to get pulled too deep into the machine and make the hook grab it and make a nice nest.

I'm not a bird, I want no nests on my quilts!

So there's one of those things that can give you mystery issues when quilting. What's an issue you found that caused you such intermittent problems that you've figured out?

Free Motion Quilting Video: Feathered Flower

I had someone ask for a tutorial on how to do the feathered flower design I was using on my niece's quilt. I've shot a video for you.


The design is pretty easy to do as long as you're comfortable with the basic paisley and the shape of a feather plume. It can be done densely as a filler or made quite large for a great all-over design.


I've been making good progress on this quilt! So nice to do something fun, fast, and free! I love doing my ruler work, but I love the freedom of a free motion filler!


I'm looking forward to getting this done and in the mail to the sweet baby in the next week or so!

Don't forget Craftsy's great sale on classes this weekend! They've got the lowest prices of the year on all classes. Use my special link to get the sale prices while putting a bit of coin in my pocket too!

Now I am off in search of leftover pumpkin pie!

Quilting Butterfly Wings and a Great Deal on My Class

Bet that title got your attention! When life hands you many quilting samples and halloween is coming, you make butterfly wings out of them. Or at least you do when your daughter wants to be a butterfly fairy princess!


I'll try to get some pics of the winged princess later. I could have saved myself a bunch of time with those cheap discount store wings, but they're made for younger girls and are usually broken in a few days.


As a Christian, I've always been conflicted about halloween and this was the first year we decided to let them dress up and take them to a "Trunk or Treat". For those who don't know what that is, it's like trick or treating but in a parking lot using car trunks instead of houses. It's become more popular in rural areas where houses are far apart, and it's also seen as more of a community event and safer. Ours was at our new church and keeps the costumes in the realm of 'cute' instead of gory or oversexualized.


The kids and I had fun making some simple costumes. I'll have to get some better ones of the wings. She didn't want to stop twirling long enough for a photo. Made the skirt too. It's a hi-low number and it looks to have rotated to the side with the twirling!

I also wanted to let you know Craftsy's got a great sale going on this weekend! Fall is such a great time to snuggle up on the couch and do some handwork, work with yarn, draw, embroider, or learn new skills at Craftsy. Stay in your PJ's and learn a new skill or expand your current skills. All classes are up to 50% off when you use my discount link: sorry, the link has expired.


Now I've got to see if I can get the sparkles off of my sewing table!

Frame Quilting Foot Set, aka Ruler Foot

Something came across my desk at work this week from Janome that made my day. So many of my Janome (or Janome foot) using friends have still been running into Janome dealers who tell them the Ruler Foot in the Frame Quilting Foot Set is only for the 1600P. Not so! I did get official word of approval from Janome on the use of the ruler foot about 18 months ago with all the Janome Convertible Free Motion Foot Sets, but there were still dealers that didn't know.


This week, Janome released a new document to showcase all the Janome accessories and this picture above was part of it! Yay! We're legit! This should make getting a foot from a dealer unfamiliar with the ruler work technique a bit easier. Or you could order from my shop....

frame quilting foot set- aka ruler foot for free motion quilting with rulers

In case you are wondering, that second foot is fabulous if you put your machine into a frame system, or get creative and decide to do your free motion quilting from the end of your machine. Otherwise, it's not much use.

I'm getting some quilting done today, so that's all I've got for now. Stitch on!

Repairing Quilting Mistakes

I've finally got a new video for you. One of my regular readers asked to learn more about fixing mistakes. She appreciated that I freely admit making them, and wanted to see how I fix them.


The video has the added bonus of letting you hear what happens when a bobbin isn't wound properly and the end comes undone while stitching. Operator error, most likely.


Here's the finished product. Can you see the repair? Me neither and that's with contrasting thread. I've also borrowed my 5 year-old's favorite new toy, a pointer finger on a stick. I think I might have to use it instead of my seam ripper!

Quilting with Rulers: Double Curved Crosshatching

Working on my ruler work sampler again, this time using the double 'S' curve ruler from Rhonda Beyer. This was actually my very first ruler purchase way back when I first decided to experiment with the Janome ruler foot.

Quilting with rulers on a domestic sewing machine-using a double S curve ruler for crosshatching
Because of the asymetrical nature of this ruler, I marked the first two lines to make sure it was even.

Nothing like starting out with one of the more tricky rulers. This ruler has two different curves and they aren't symmetrical. I use a piece of tape to mark where I want to start or end my curve. Then when I'm ready to do the other side, you've got to flip it over to get the mirror image curve.

double curved crosshatching

It's a great ruler, but don't set it aside mid-project as you might have a hard time figuring out the position to get the correct curve when you start back to it. Several minutes were lost today as I tried to remember which side I was using and which orientation.

quilting with rulers double curved crosshatching

Because of the asymmetric curves, sliding the ruler down or up along the line of stitching can throw things off. So you've got to be careful if you want very uniform spaced crosshatching.

pretty feathered corner with double curved crosshatching done on a sewing machine and using quilting rulers

But it does result in some very graceful effects. I'll be using this ruler in all four corners. I will be doing some variations in each corner too. I like how it turned out, even if doing these pretty formal feathers is a bit difficult to get fairly uniform.

Don't forget that Craftsy's got another great sale going on. You can use my special instructor link to get the best sale prices on ALL the classes.

I'll be doing a more in-depth post about using this ruler next week and maybe shoot a video. What rulers, if any, are you using in your quilting lately?

Get Your Rulers: Amy's Quilting Adventures is Open!

After receiving so many encouraging comments after yesterday's post, how could I not open my shop? You guys are the BEST! I hunkered down and the shop at Amy's Quilting Adventures is open.

It's not perfect, but it's functional. More importantly, I think the product descriptions on my offerings are the best out there. My knowledge and experience with the technique and products available will help you make your selections with confidence.


I'm sure I will continue to add pictures, content, and of course, more products as time goes by. Some of the links might not work yet, but everything important is there!

This is a huge undertaking for me. Not that I was concerned about making enough sales, in fact, I'm more concerned that I will sell out too fast before I can get my next orders of product in! I don't want to disappoint you with "Out of Stock" notices. That's the pits. And I hope I have everything set up correctly tech-wise.

Shipping is a bit scary. To have the USPS (or other carriers) integrated into the shop to calculate actual shipping costs as you place your order is hugely expensive, in fact many of the big shops out there don't do it. So it takes a leap of faith to determine shipping rates when starting out. I hate it when shops do the "we'll calculate shipping costs and get back to you" sort of thing.

So to simplify things for you as well as myself, I've set up a flat rate for shipping. If the order ships to the USA, you'll pay only $6. In Canada, it will be $14. Most likely this means we will be absorbing some of the costs of shipping for larger packages, and any packages to Canada. It is our hope that the sales from larger orders will make such costs worthwhile for us.This may not work out in the long term, as shipping seems to go up, up, up. But we'll try it.

I can hear you now, "But I'm not in the US or Canada!" I'm sorry, I really am. But I need to gain some confidence with the shipping process first before undertaking the more complicated aspects of shipping to other countries. We will most likely add shipping areas over time.

More importantly as I start this venture, I am so happy to be able to make getting rulers easier for my students and blog followers. I am amazed at the support and encouragement you give me and each other and I'm excited to see where this adventure will take me!

So now to announce the winner of my ruler giveaway! I've got 719 subscribers to my email list and the random winner is number 493! Let's see who that is......

Joanne Francis! I'll be sending you an email to choose your ruler shortly.

Thanks to everybody who has signed up for my newsletter. I'll be getting one ready to send asap to announce the opening of the shop. After that, I hope to begin sending a newsletter out no more than twice a month with news about the world of quilting, news about what I'm doing as well as some shop happenings, but also content that is interesting, useful, different than the blog, and not spammy. Hate spam.

Go Slow

When you've left your kids twice during the summer and then birthed a new baby in the form of a Craftsy class, the quilting slows down for some important things.


Like this beautiful, creative, crafty, free-spirited girl of mine. We've been sitting down to watch a Craftsy class on crochet together, Crochet Basics and Beyond. She's been crocheting for a while, but not following patterns and not really wanting me to teach her more than a few basic stitches. She likes free form crochet. After going through enough yarn to wrap around our house a few billion times, much of which ended up looking like a shag rug went through a shredder, she's now delighted to follow a class together. Even more so when she realized the instructor was the author of her favorite crochet book, Teach Yourself Visually Crocheting, Kim Werker. My daughter is so worth going slow for.

But I have gotten some quilting in between answering emails and questions/discussions in my class, doing some promoting of the class, trying to get some other work done, and more.


This quilt is worth going slow for too. It's a nice sampler quilt that I challenged myself to piece. See, I'm really all about the quilting and have always thought I was a pretty poor piecer. But I took my time and got it put together quite well.
 
curved crosshatching on a regular sewing machine


Now I'm using it to showcase a wide variety of ruler work designs. I'm using a light turquiose thread to show the quilting better, which of course means any little bobbles show. It reminds me of watching gymnastics: "Oh! A little bobble there. That's going to cost her." Nevermind the girl may have done a triple handspring with a 180 twist on the beam, a little bobble shows.

For me, it's not the quilt police or even show judges that I'm worried about. It's my own perfectionistic tendencies and inner mean-girl. But I'm getting better at shutting up my own worst critic. I planned to take a picture of this area below to show you why you should go slow when you start stitching with rulers.


Once I got the camera out, I could hardly see the spot that I wanted to show you. It really wasn't that bad at all. I'll get to the tip in a moment, but let me just point out the bigger thing here and that is if you see some quilting as you stitch that you don't like, step away from the quilt for a moment. Spread it on a bed or take a picture (not with the macro lens!) and then decide if it's something that really needs fixing.

What I wanted to point out is that it always pays to start out slow when free motion quilting, especially when doing ruler work. There are some side-to-side forces on the fabric sandwich and while you're using your needle down function (I hope you are!) everything is secure. But the minute that needle goes up, if there's tension in the wrong direction, the quilt can shoot off from where you wanted those first stitches to go. So take it very slow until that first stitch is in and the quilt is under your full control.


This part above definitely needs fixing! I got a little careless and stitched right into the frame of my curved crosshatching. But it was easily fixed.

free motion quilting with rulers on a sewing machine

Another block down, but what will I do to finish out that sashing design? It's reminiscent of the frame border I teach in my class, but in a much smaller scale. It's done with the BFF from the Quilted Pineapple (See her ad for templates in the right sidebar), but I don't want to treat it like that design. I'll quilt somewhere else while I think about it.

Speaking of going slow, if you're new to ruler work, don't feel like you've got to run out and buy a ton of new rulers. You can learn the technique and explore a lot of designs with just a straight ruler and a curve or two. There's plenty of time to add to your ruler collection. Of course, if you want to buy a bunch, I'm hoping you'll visit some of my sponsors or wait another week or two for my shop opening. I definitely didn't go slow when ordering rulers and templates for my online shop. If I think too hard about how much I have spent, my heart starts to race!