Showing posts with label crazy life and sewing. Show all posts

A Few Words About Creativity, Quilting, and Judgement

 Hello my quilting peeps!

A few weeks ago Eric and I went on a little road trip to a few of my quilt shop mentors. It was a substitution for the cancelled Janome Institute, where we dealers were going to see the new machines. Alas, that's been delayed. So we decided to make the most of it and still do a business trip of another kind.

While we were in Marysville, TN visiting the wonderful Terri from Mountain Creek Quilters, we did a quick video. She is a great encourager (and quilter!) and so we decided to have a chat about creativity, quilting, and judgement. I see this in a lot of my students...mostly of the self condemnation kind! It's part of my life mission to help people use their machines with more confidence for greater creativity, so it seemed like a great topic.


I hope you found this video encouraging!

I don't know about you, but it seems as if kindness, good manners, and compassion are in short supply these days. What's the saying? Be the change you want to see in the world?  We must be kind and compassionate to ourselves and then pour out the overflow of kindness and compassion on others. Oh, and I totally have yet to learn how to be kind to myself, so please forgive my hypocrisy! I am working on it.

Be well and I'll see you in the next video.


PS  I've been doing more YouTube videos these days on my AmyQuilts YouTube channel. Check them out!

Sew Simple Studio for AmyQuilts.com

I have been remiss in blogging about my newest challenge and project. I've talked about it in Facebook, but haven't actually posted here. For Christmas, I gave myself a building!

OK, so I actually signed a lease for the building, a 1920's storefront in my local town of Altavista, Virginia.


Why? First of all, we're not moving or closing our shop, Sew Simple of Lynchburg. Rather this is a way to make our shop better. We are getting crowded in our current location and I kept driving around Lynchburg looking for possible places to move the shop. But there really wasn't anything that was a reasonable step larger. Just places that were huge, expensive, or not in a good location.

Add to that, we still have a few years on our current lease and it is in a great location. I had spent a fabulous weekend in early December with Carol Britt from Batiks Etc. & Sew What Fabrics in Wytheville, VA where we talked about our visions for our businesses. I had shared with her my trouble seeing us get bigger, as well as my frustrations of not having time to make the projects I wanted, recording my videos, and topped off with late hours at the store trying to do that, I was missing having time with my kids.

On my 2 hour drive home from Wytheville, I had plenty of time to think. I began to think of what our shop did, what our customers wanted, and whether there was anything that could be taken out of the store to give us more room for the necessary activities and products. Suddenly, it hit me, I didn't need to be there!

That's sounds a bit drastic, I know, but as I thought about it, my video equipment and my sewing machine set up could be removed from the shop and would give the shop's classroom some much needed space. Additionally, I could do much of the shop's admin in a different location which would allow us to use some of the office space at the shop for processing inventory when it comes in. This is an activity that often was being done in the classroom. As a result, we often had to clean up the classroom to have a class and also, get my stuff back out in order for me to make samples and videos.

I love my set up, but it takes up a lot of space in the store's classroom.

But I already knew working from home wasn't going to work. I have already been doing much of my computer work from home and it just wasn't working well. There certainly wasn't room in our house for the sewing and quilting studio, plus the video equipment. So what's a girl to do?

While space in Lynchburg was hideously expensive, the small town we live in (or officially, across the river from) had several vacant storefronts, like many small towns these days. I set a budget and decided that if I could find a space that fit it, I'd set up a studio space. This choice has been a real challenge! It means stepping up and making sure I am using this space to generate it's own income via video classes, pattern design, writing that book on ruler work that I really need to do, and more.

Isn't it funny that even when you feel like you just can't do one more thing, life has a way of making sure we step up, take it on, and move forward?

Removing a partial wall that had been added in the past.

My new studio has three main areas, my quilting and video area, an open space twice as big as the shop's classroom, perfect for hosting classes and workshops, and a private back area for my office and space for my kids to hang out.

Speaking of the kids.... the studio is walking distance from school for the older two, as well as the library, 2 parks, and the Y. It's a mere one mile from our house, though with the hills, river, and road between the two, not great for walking or biking from home. Since the studio will not be open to the public other than for special events and classes, they can spread out through the space. Leah is looking forward to more sewing time with me and my geeky oldest is looking forward to inviting his friends over after school to game together sometimes. Leah has asked for crafty classes for her and her friends too.

The community is also asking for classes. Some are quilters, but there is also interest in just having something fun and creative to do in a small town. I'm certain we can provide that eventually.

The building had been home to a series of hair salons since the 40's. The last one had an interesting mix of Art Deco meets Industrial design.

In the meantime, I have a lot of work to do. Nearly 100 years old, this building has a lot of character and what has been referred to as "layers."  Some of the layers are good, others, like the remnants of a past dropped ceiling and the cheap paneling put over the original bead board is not so great. My budget is small, so the work and outfitting the space with what it needs will happen gradually, especially as I still have my duties at the shop to attend to.

The painting begins. Not sure what colors we will paint the walls, but we're starting with primer.
While I will be separating my duties across two places, it will allow me to be more focused, efficient, and present in each space. That's a good thing.

Leah Day and Amy Chat on Hello My Quilting Friends

I cannot believe I never posted that I was a guest on Leah Day's podcast recently! I shared it on Facebook and then totally dropped the ball.


Hopefully you've been catching these very interesting episodes hosted by Leah as she interviews people from the quilting industry and beyond. The show pulls back the curtain a bit into the business side of the quilting industry and she decided to interview me about running a "brick and click" business. Brick and click means a business that has a store front as well as an online component.

Actually, she wanted to see how I balance life and work between the two businesses.....insert hysterical laughter here.........and I am not the person to talk about balance! It's a constant juggling act with balls getting dropped from time to time. I liken it to standing on a teeter totter. Ideally, you're in the middle, keeping both ends balanced. More likely, it's a dance from one side to another, a constant wiggling back and forth. It's a pretty wild and amazing ride and I think Leah did an excellent job of asking the right questions to bring out my story.

You can listen here: Hello my Quilting Friends with Leah Day, episode 26


Creativity: On a Wing and a Prayer

"You can't just wing it!"

Yeah? Watch me.

I should have feathers, I 'wing it' so often.

In fact I fly often by the seat of my pants!


No cage for this bird, I'm taking flight!

Sure, there are some things that you can't just wing. Taxes for instance. To bring it to quilting, it's highly likely that winging a complex pattern of angles and measurements is bound for unexpected results, if not downright disaster.

Disaster being relative of course, as this is just quilting, not brain surgery.

Speaking of the brain, it's common to refer to people like me as right-brained and people who are more analytical as left-brained. Turns out that research doesn't support the idea of using one side of the brain over the other.

Because I do tend to wing it, (and my memory is poor) I don't tend to use left or right brain terminology, instead I like to refer to people tending to be more like an artist, or more like an engineer. Yes....because I can't remember which side is supposed to be which.

I talk about this artist/engineer concept often in my free motion quilting classes as I find that there's usually a correlation that affects how easily someone picks up free motion quilting.

I'll talk about that in another post, but today I just wanted to sing the praises of being able to let the artist in our brains have some freedom. In part it's because you can't just 'wing it' when it comes to running a business (yes, I've tried), especially that of a retail business and in the quilting industry as well. I've been squashed creatively. Well, except for the pretty awesome row I created for my shop's participation in the Row by Row Experience this year. Any rail fan will recognize the 611 steam engine.

So I've stepped away from the computer, accounting, and huge piles of paper in order to maintain my sanity and to let my creative spirit come out to play. Just a little bit, at least. Every day I now make time to wing it in my studio.

Two of my projects are totally wing friendly. First, I've started doodling on the boring brown wall in my shop's bathroom with a white chalk marker. (Chalk marker, because in theory, I can wash it off. At least enough to paint over it.) Yes, the bathroom is getting a custom mural of quilt doodling!

Just doodling when I can.

The second project I'm pretty proud of so far. I'm making a linen slip cover for a wingbacked chair in my shop. It's the non-shopper/handwork chair. Not the husband chair, just the waiting chair. It's had a large cream and green toile slip cover over it for ages. Every time someone sits in it, the thing shifts and looks bad.

So I made the slip cover fit better and then began using it as a very rough pattern to create a new cover out of linen. By rough I mean slap the cushion onto the fabric and trace around it with a blue marking pen. Sloppily, messily.

Guess what? It worked! More importantly, it's been getting done instead of just sitting there, waiting for me to be able to 'do it right' as that might happen never.

Just a ruffle and some finish work and this chair will look so much better.

And folks? Getting something DONE is what got me into quilting in the first place. It feels so good to have something done, even if it isn't perfect, in a time of a never ending to-do list. My season of chasing around little ones and a house that comes undone constantly may be nearly over, (The kids are still quite the mess makers!) but the never ending undone stuff has just changed to different stuff.

Think about it.... are you letting the need to make something "right" keep you from getting things done? Sometimes close enough is perfect. As my husband sometimes says, "gooder enough." Yes, he knows that drives my inner grammar nazi crazy, one part of me that is decidedly left brain. (Let's leave my overuse of exclamation points and .... out of things, shall we?)

There's a reason why improve piecing, scrap piecing, and folksy wool applique is on the rise. These things allow for less precision and more winging of various aspects of it. Life can get horribly rigid, regimented, and judge-y. Fight it by allowing yourself to enjoy the less than perfect process.

Free motion quilting looking not as good as you want? Give yourself permission to just wing it and play with it. I guarantee you'll get better and some projects will get done!


Saturday Satisfaction

Happy Saturday folks! I'm sitting in the shade of my porch, accompanied by a skink, wren, and a horde of invading stink bugs. Enjoying the benefits of wifi, I'm basking in a feeling of accomplishment. As I've said when referencing how I got interested in quilting back when my kids were toddlers, I needed a feeling of accomplishment. Life was a series of things that didn't stay done; dishes, laundry, diapers. But stitching stayed done. Seems shipping out packages gives a great feeling too.

Today I sent two big totes of packages to the post office. My hubby pitched in and we enjoyed working together. Working together isn't new for us and we really enjoy it. My oldest son helped a bit too; trimming mailing labels, cutting tape. It is so satisfying to see the response the shop has gotten so far and knowing that I'm helping so many with their quilting and creativity.

This morning Patsy Thompson wrote a big review of my Craftsy class, Machine Quilting with Rulers on a Home Machine (That's still a 25% off discount link), and was so complimentary I was blushing! She's pretty incredible too...and is a big reason that Craftsy contacted me.

Speaking of Craftsy, they're having some more sales this weekend with online classes up to 65% off in the following sub-categories:


•  Sewing: Bags
•  Knitting: Colorwork
•  Quilting: Big Quilts
•  Painting: Figures & Portraits
•  Drawing: Figures & Portraits
•  Cake Decorating: Sugar Flowers
•  Paper: Mixed Media


You can learn something new and achieve amazing results in a Craftsy class. Right now during Craftsy’s sale, you can use my affiliate link to save and support a craft you love. [Click here to use my affiliate link]

I don't think hubby really understood how much interest there was in ruler work, finding great supplies for it, and how wonderful my follows were until yesterday. He's very supportive, don't get me wrong, but he's a numbers guy and it just clicked for him. After a talk about social media, he asked the question, "What is the biggest thing that keeps people coming to your site?" I told him it was ultimately the quilting. I can't share it, teach it, or post, pin, 'gram it, if I'm not actually doing it! A wonderful conversation followed about delegation and shared responsibilities. Looks like I will get a little more time to quilt!

Quilting with rulers
Poor neglected quilt!

That's exactly what I am going to do right now folks! I'm heading inside to stitch on my neglected ruler work sampler.


Of Dahlias and Deadlines

Fall showed up yesterday and today has been absolutely beautiful! Seems like such a shame to spend any of it at the grocery store. But that's my usual Monday activity. I did get some stitching done as I worked to upload products into my online shop.

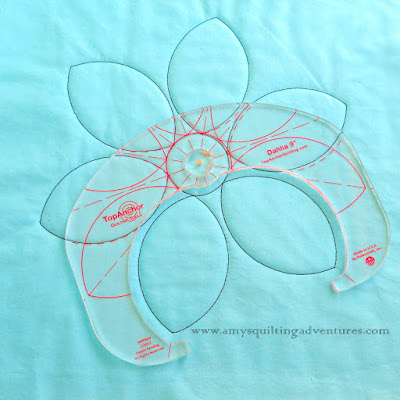
Dahlia template

Since I want to make sure my shop has the best info out there on a variety of rulers, I figured I better stitch out samples for some of the more unusual templates.


Here's what one full repeat of the 9 inch Dahlia template from TopAnchor Quilting Tools looks like, above. Below is after I've stitched the second set of patterns. This thing is fun!

Quilting with rulers dahlia

I even shot a short video as I stitched. I'll get it edited and up later this week. Don't forget to stop in here Wednesday when Christa Watson's blog hop makes a stop. I'm doing a giveaway! Technically, I'm doing 2 giveaways. Here's her Blog Hop Schedule.

Now, one of the reasons I started blogging was to share the quilting I was doing, but another was for the accountability it gave me to finish projects. Completing what I start is a struggle for me and there's something about having an online community of friends to report to that helps me get things done. So many quilty ideas, so little time.

You've heard me mention my online store several times here and I have to admit, I keep picking away at it, but not pushing too hard. But I've also had a lot of good feedback from readers and students from my Craftsy class, Quilting with Rulers on a Home Machine, that say they are ready to shop. That's a 25% off discount link, BTW.

So I'm putting my foot down and giving myself a hard, solid, deadline. With you all as my witness, I will open my shop Friday. Yep. Gonna do it. Maybe. I think I can, I think I can.


Busy Little Bee

I've been a busy little bee lately. Maybe not so much on the little, more like a bumble bee, especially as I'm charting new territory and stretching a bit outside what I know. But how else do we learn? So I'm buzzing and bumbling along.

My Craftsy class, Quilting with Rulers on a Home Machine, has been very well received! Over 1000 students so far and I'm getting a ton of positive feedback. I'm answering a ton of questions too, which is a great part of the Craftsy platform. That's still a discount link above, and there's going to be a big sale for Labor Day weekend at Craftsy, so come back here Friday to make sure you get a link for the best price available.

My poor happy flower is a little droopy. Somebody knocked it off the window ledge.

How do you like my new work surface as a backdrop for photos? I'm taking pictures of products (not this bee) for my soon to open online shop. I can't wait to open this convenient spot to review and purchase the best assortment of rulers for free motion quilting.

Here's one of the reasons I like my new tables to have wheels! I can move things around to take advantage of natural light.

I'm using a big piece of white foam core to help get light where I need it.
In other news, I've got a guest post up over at Christa Quilts today. Bet you didn't know that I was once worried that Christa might have been my first stalker? Turns out she was just very enthusiastic. Go check it out and see why!

Christa's a pretty busy little bee too. She's got a book coming out very soon and you'll hear more from me about that later, plus some great patterns and her own precut shop too.

If you haven't signed up for my newsletter (see right side of blog), please do so. This is new for me and different from following the blog via email (an option on the left sidebar- I don't have access to those emails). I want to be able to send you additional great quilting info, updates, and an announcement when my shop opens. I promise not to hit you with a bunch of spammy "buy, buy, shop, shop" kind of things.

Go Slow

When you've left your kids twice during the summer and then birthed a new baby in the form of a Craftsy class, the quilting slows down for some important things.


Like this beautiful, creative, crafty, free-spirited girl of mine. We've been sitting down to watch a Craftsy class on crochet together, Crochet Basics and Beyond. She's been crocheting for a while, but not following patterns and not really wanting me to teach her more than a few basic stitches. She likes free form crochet. After going through enough yarn to wrap around our house a few billion times, much of which ended up looking like a shag rug went through a shredder, she's now delighted to follow a class together. Even more so when she realized the instructor was the author of her favorite crochet book, Teach Yourself Visually Crocheting, Kim Werker. My daughter is so worth going slow for.

But I have gotten some quilting in between answering emails and questions/discussions in my class, doing some promoting of the class, trying to get some other work done, and more.


This quilt is worth going slow for too. It's a nice sampler quilt that I challenged myself to piece. See, I'm really all about the quilting and have always thought I was a pretty poor piecer. But I took my time and got it put together quite well.
 
curved crosshatching on a regular sewing machine


Now I'm using it to showcase a wide variety of ruler work designs. I'm using a light turquiose thread to show the quilting better, which of course means any little bobbles show. It reminds me of watching gymnastics: "Oh! A little bobble there. That's going to cost her." Nevermind the girl may have done a triple handspring with a 180 twist on the beam, a little bobble shows.

For me, it's not the quilt police or even show judges that I'm worried about. It's my own perfectionistic tendencies and inner mean-girl. But I'm getting better at shutting up my own worst critic. I planned to take a picture of this area below to show you why you should go slow when you start stitching with rulers.


Once I got the camera out, I could hardly see the spot that I wanted to show you. It really wasn't that bad at all. I'll get to the tip in a moment, but let me just point out the bigger thing here and that is if you see some quilting as you stitch that you don't like, step away from the quilt for a moment. Spread it on a bed or take a picture (not with the macro lens!) and then decide if it's something that really needs fixing.

What I wanted to point out is that it always pays to start out slow when free motion quilting, especially when doing ruler work. There are some side-to-side forces on the fabric sandwich and while you're using your needle down function (I hope you are!) everything is secure. But the minute that needle goes up, if there's tension in the wrong direction, the quilt can shoot off from where you wanted those first stitches to go. So take it very slow until that first stitch is in and the quilt is under your full control.


This part above definitely needs fixing! I got a little careless and stitched right into the frame of my curved crosshatching. But it was easily fixed.

free motion quilting with rulers on a sewing machine

Another block down, but what will I do to finish out that sashing design? It's reminiscent of the frame border I teach in my class, but in a much smaller scale. It's done with the BFF from the Quilted Pineapple (See her ad for templates in the right sidebar), but I don't want to treat it like that design. I'll quilt somewhere else while I think about it.

Speaking of going slow, if you're new to ruler work, don't feel like you've got to run out and buy a ton of new rulers. You can learn the technique and explore a lot of designs with just a straight ruler and a curve or two. There's plenty of time to add to your ruler collection. Of course, if you want to buy a bunch, I'm hoping you'll visit some of my sponsors or wait another week or two for my shop opening. I definitely didn't go slow when ordering rulers and templates for my online shop. If I think too hard about how much I have spent, my heart starts to race!


Craftsy News and a Newsletter

Hello, all you wonderful quilters! I am so stinking excited to let you know that I have recieved official word and my Craftsy class, Quilting with Rulers on a Home Machine will go live sometime this Monday, August 24th.

ruler work on a sewing machine craftsy class

To celebrate this class launch and to thank you for reading about my quilting adventures, leaving wonderful comments and encouraging me along the way, please sign up for my brand spanking new email newsletter on the right hand sidebar so I can let you know when the class is live and give you a discount code to get my class at a reduced price!


There will be no spam, I promise. Ever.

I am still at Janome Institute and learning a ton, so I don't have much time to devote to the blog as I'd like. I'll get back to a regular schedule Sunday so I can devote my focus to the blog and to my students via the Craftsy platform. I've got a few glitches to work out here and will get to them in the next few days: the newsletter doesn't seem to work for mobile devices and there's one other minor issue. The link you receive in your email to verify that you want to sign up will send you to a confirmation page that asks if you want to proceed to my site. The site it takes you to is my new site (amysquiltingadventures.com) which is completely blank. No fear, the blog didn't disappear.

Janome Institute

Hello from San Antonio!

Would you believe there's no free wifi in my room at this very nice Marriot in beautiful downtown San Antonio?! It's making it hard to keep up with some of my work, so I'm going to keep this short and sweet.


I got a picture with Aurifil spokesman Alex Veronelli. I had no idea when my dealer decided to send me to this Janome training that there would be a vendor hall! I should have brought a bit more money.


Not much quilting on this trip, but we whizzed through 4 sample projects on this serger (1110DX) and the Janome 2000 Coverstitch machine.


I met up with some lovely dealers for dinner on San Antonio's famous Riverwalk. Apparently Cinderella lives here. Who knew?


It's been a great trip. But it's a little hard to take in all the information on these wonderful Janome machines (and there's 3 new models!) and plan for what looks to be next week's launch of my Craftsy class.

Stay tuned as I plan on offering a discount link here for the class!

Reorganizing the Studio: Part 3

I am so excited to have done these changes to my studio! Thinks look so much more eye appealing now. When your studio is the first thing people see when entering your house, it's got to look decent. Maybe not magazine worthy, but tidy. Plus, I just can't work if things are all messy.

This table and its mess underneath just had to go. 
All the elements are in place, but I'm not entirely sure if things are in the right place. I'm sure the fabrics and all my little plastic drawer units need further organizing, but I'm not quite sure how I want the tables arranged. Good thing the two new ones are on casters and my machine's table has felt feet that are easy to slide across the floor.


There's my favorite handy man. The white shelf was $15 at a thrift store. It was a hideous pink with painted flowers. He mounted it to the wall for me along with my old peg rack and a new to me treasure-- my grandmother's sewing box, made by my grandfather. It's even got a few wooden spools of thread in it.


Above is the first arrangement of the new tables. My sewing table sticks somewhat awkwardly into the middle of the room, but is placed to take advantage of the natural light. Depending on whether I was working or not, and whether I was using my Janome or using the table for cutting/pressing, I'd slide the white table one way or another. The new tables are 4 inches narrower than the banquet table, but it's still a bit crowded.


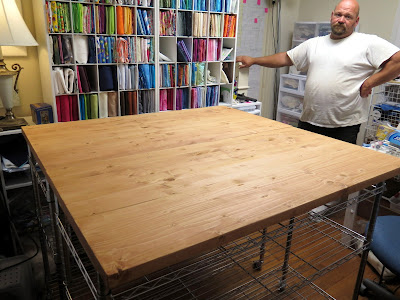
I love these two new tables! They're made from a set of shelves I already had, but we broke them into two halves and put wooden tops on them. The shelves were adjusted for best use of my plastic drawer organizers. I also have a shelf just under the top that is a great place to set my laptop, papers, and such when I want to use the work surface for cutting or pressing.


Above are some of the shelves that were replaced by the new cubbie units. They've been tucked into the corner across from the end of the stairs. We don't open that door, but I use it for my calendar. (I take a cheap calendar apart, cut off the pictures, and tape all the pages so I can see the whole year at a time.) My lights, tripod, and a few other odd shaped things are stuck in this corner as well. I plan to keep my eyes peeled for a cabinet with a hutch or something similar to replace the plastic units one day.


Above, the tables have been positioned back to back for use when doing a bunch of ironing. I had to move my sewing table to make space for them and now that I've moved it (and have better lighting in the room) I think I will keep it this way.


I like it this way, above, but I'd move the computer on the other side, closer to my sewing machine so I can look into the dining room and not be so close to the front door. It's a very work friendly arrangement. But I also like the open area provided by the arrangement below.


With the casters on the new tables, I can move easily from one arrangement to the other. I can't quite decide which way I like best. Which do you like best? Tables back to back, or tables along the wall?


Here are my cubbie units. I love them! By Closetmaid, there are 2 9-cubbie units and then there are 2 shoe organizers on top. Hubby bolted them together for stability and attached them to the wall and stair banister for safety. I folded my fabric fairly neatly by wrapping it around my 5 inch wide cutting ruler and then folding it in half, selvedges to center fold of the fabric. Fit perfectly.


 I found some Command hooks with metal pegs and stuck them to the side of the cubbies closest to my machine. They're perfect for my rulers.


Now with my studio all tidy, I need to get some serious quilting done. I need to finish my ruler work sampler quilt (and post it to my Craftsy class projects area) and shoot some videos. But I head out early Tuesday morning for a week in San Antonio for Janome Institute. I'm going to this dealer event on behalf of my local Janome dealer. Then my Craftsy class should be ready for launch soon after my return. So serious quilting will have to wait a bit.

quilting and sewing space link party

So now it's your turn.

I'm setting up a link party with this post so you can share your quilty space. Whether you've got a jaw-dropping beautiful studio, just a functional space, maybe a nook in some other room or just a small bit of your space that makes you happy, share with us here. Make sure to visit one another and leave comments. As part of the link up, I do insist that you link back here so others can find the rest of the party. If you don't have a blog and want to share, email me one picture at amy(at)amysquiltingadventures(dot)com and I'll post it here.

Scroll on down for the Linky, here's pics of my non-blogging readers' studios:

Here's Paula's "she-cave"  She says: "My sewing and weaving space (my floor looms it's by the TV) is our finished basement.  It opens onto a three season porch where I often will "spill into" when the weather here just south of Boston cooperates.  My sewing room used to be part kid playroom and part office.  Now that my kids are grown and living their own busy lives, I have repurposed the space to a she cave and have moved my home office to what used to be one of our kid's bedrooms.  I am jealous of your fabulous natural light I could use a little more of that.  Here's a picture of my space....


Studio Progress and Back to School

My kids headed off to school this morning-- even my little guy happily headed off to Kindergarten. It might have been bittersweet, but right now it just feels sweet.


I went for a bike ride after they left and then buckled down and worked on my studio. The new shelves are all done, so I moved them into position and worked on loading them up with my stuff.

New tables and storage for the quilt studio
There's my wonderful handy hubby with his handiwork. 
Replacing the mostly functional banquet table with the two new tables. The new tables have much better storage under them. I'll tell you more about them on Friday.


 It seems like my stuff has grown. It doesn't all want to fit. But today wasn't about getting the fabric, tools, supplies, batting and other quilty paraphenalia all organized, but to get the new shelves in place and the old ones moved out, not to mention getting supplies off the floor! I still have much to do to get this project all finished.

Friday I will show you the final post in this Studio Reorganization Series and I'll have a link party set up for any of you who blog and want to show your quilting spaces. If you don't blog, feel free to send me one favorite picture of your studio via email and I'll share it too.


One of the wonderful things about back to school time is the school supplies. If you haven't checked out that section of your local store, you're in for a treat. There's the usual stuff of course, but also some beautiful binders, organizational supplies, paints, sketchbooks and journals, and other handy stuff for artists, creatives, and quilters.


I picked up these coloring book style pocket folders for $0.25 per 2-pack. Something for my daughter and I to color together. I almost picked up the cutest little watercolor sets in a tiny tin at Walmart, but restrained myself.

But I can't help myself when it comes to my favorite Kindergartner. He says he loved his day and can't wait to go back.


After my bike ride, I sat in the park for a bit and enjoyed the peace of the morning. I ended up sharing some thoughts on my personal Facebook profile and I thought they might encourage one of you today. It's more touchy-feely than I usually post here so if you're not interested, it's safe to click away now, but come back soon as I've got an interview for you from the talented Leah Day on Wednesday, the Studio Link Party on Friday, and more information coming up about my Craftsy class.

Friends, I'm sitting here in the park listening to the river flow by, the breeze swirling around me, and wrapped in the most incredible sense of peace. I wish you could feel it. I am certain (in this moment - y'all know I am prone to worry at times) - that God is with me and mine, that the challenges and hardships we will face will grow us and be for a greater purpose (maybe one we will never see) and that we are incredibly blessed to have overcome the challenges and fears of the past. I am so grateful that despite our financial hardships I was able to have my kids home with me for so long. I am also very excited to have the opportunity to use my gifts in the pursuit of a self-made career. That's a chance not many get or that are encouraged to step out and try. So now I turn the page and face a new season (and mix my metaphors) and make the most of it! God is so good and my husband is pretty awesome as well!
 I followed up with this comment: And this post is mainly for myself because hard times will come, fears will creep in, and I want to remember how awesome this moment is.
You, my dear blog readers are a huge part of the good that's going on in my life and I thank you so much!


Reorganizing the Studio: Part 2

This weekend we are tackling part two of my studio reorganization. Part one was the addition of cubbie units to hold most of my fabric and replace a hodge podge of storage units. They've worked out great, but still need a little organizational tweaking.


My cutting table is a large folding banquet table that's been raised up with some pvc add-ons to the legs. Very functional and ugly. Also the folding parts of the legs makes it hard to use the space efficiently for storage.


We've decided to take the tall metal shelving unit apart and create two shorter shelving units out of it. These new units will sit side by side as a cutting table, ironing surface and computer work station for most of the time, but can be put together to create a larger work table. All the stuff on the shelving unit had to go somewhere of course. I also haven't finished clearing out the wire basket units.


The hope is that I can get things set up so I can create and quilt without creating a huge mess and also so I can use my computer, camera, extra lights for shooting videos, and still not be embarrassed to have someone come to the front door. Up to this point it was difficult to switch from one activity to another, whether it be ironing, cutting, sewing, using my computer, or taking photos or videos.


The shelving unit was taken apart and wheels added. This went amazingly well. My hubby was happy to find that the locking casters I bought at Walmart screwed right into the inside of the shelving unit's posts.


We have 2 of these tall units and we used the bottom halves of each to keep them the same height. The top halves were put together and are used in another room, for another purpose.


The top surface is one inch thick glued wood panels. Real wood, but smaller pieces glued together. We bought them at Lowe's for around $32.00 each. Once the hubby gets the supports finished, I'll be sanding, staining and sealing them. 


My kids start school on Monday and while I will miss them, I am looking forward to uninterrupted creative time. (I am seriously going to miss my little guy who heads off to Kindergarten.) I've got some great stuff in the works to share with you and I am so excited about my Craftsy class coming out near the end of the month. (No, I don't have an official date.) The class will allow me to interact with and answer questions from my students learning ruler work in much more detail than I can here on the blog.

It's such a blessing to have my own creative space in our small house. It's also pretty interesting to see how we've adapted the house to the different seasons of our life. We've changed the purpose of several rooms over the years. Adapting to life and moving forward. Have you found done the same as kids are added to the family, grow, leave the nest? Maybe you've moved houses or added/removed a home-based business? Tell me about it in the comments. (In fact, I think we can do a one-time linky party as part of my post when I show my room all done. No need for magazine-worthy spreads, but share your favorite space or organizational set up for your quilting. Get your space ready!)

Now, I should get back to the work of studio reorganization and also give my handy hubby a big hug. He's been working hard on this project. I can't wait for Part 3 of this series and show you the "after" pictures!