I've made a few changes to the blog lately and even came out of the blogging closet to my local quilting friends and Facebook peeps. I resolved to post at least three days a week, planning for M,W,F posts.
So this pathetic post is to keep me from falling behind on my resolution. Today I am feeling like crud and am not up to posting. I did however finish the appli-piecing of the main portion of my latest quilt. It is coming together quite well. Now I need to make a decision regarding what batting to use. I had planned on using a wool bat with a Quilter's Dream poly behind it so as to give a faux trapunto effect, but now I am wondering about bearding on this very dark fabric.
I think the best solution is to make another sample. This time with the same batting I plan to use.
Now to get back to wheezing and hacking....

Sharing tips, tricks, and inspiration from my own free motion quilting adventure.

Speed is Relative: Tools for Regulating Free Motion Quilting Speed

The two most important tools for regulating your quilting speed are something many quilters don't want to hear, so I'll save them for last.
I will not cover stitch regulators as I have no experience with them. In the domestic sewing machine market they are limited to the higher end Berninas. There are a few other stitch regulator-like gadgets and tools out there I think, but again, I have no experience with them. I think you don't need them either!
Machine Speed Control
The number one speed control tool that all quilters have is the foot pedal. Make sure it functions properly and doesn't have places it gets 'stuck'. Speaking of stuck, make sure it doesn't slide around as you stitch and is positioned at the most comfortable spot for you. I have wood flooring in my sewing space and I use a few rubbery glue dots on my pedal to keep it in place. They work even though I pack up my machine quite often to sew elsewhere and re-stick just fine. I have heard of folks using nonskid rug matting too.
The foot pedal is a pretty basic device. If you have a fairly knowledgeable sewing machine service person in your area, it may be possible to upgrade your foot pedal to something more responsive. If you do not have a variable speed setting or slider control on your machine (more on that in a minute) you may want to rig a 'stop' of sorts for your pedal that allows you to 'floor it' without having your machine at top speed. Taping a block into place that prevents the pedal from going all the way down is the primarly method. Some people find it more comfortable to be pressing their foot all the way down rather than floating it somewhere in between. I think that you lose something in the control of your speed by getting used to 'flooring it', but it works for some. Leah Day at the Free Motion Quilting Project had a few tips for creating a 'stop' on her site at one point, but now I can't find the info. I think it was in one of her earlier videos on FMQ basics. Her advice on speed control is here, but it's one of the two tools I said you won't like......
Most of your mid-range machines have a variable speed control. It's a knob or slider that regulates the maximum speed you want when you sew. It can be helpful to slow the maximum speed so that if you do press all the way down with the foot pedal, it is a speed you can still control while quilting.

When I first started Free Motion Quilting, I used my speed control to help me control the maximum speed. In fact I once was looking at a larger machine that had no speed slider/control and its lack was a deal breaker for me.
It's still not a matter of flooring the pedal at a slower speed though. Different motions of machine quilting require different speeds. But it's a bit like training wheels while you get the hang of varying the machine speed and your hand speed. In fact, I rarely set my machine slider anymore, which is a good thing as the slider control is irresistible to my three year old; though I usually discover his treachery when I find my machine will hardly go! It takes time and practice. Which brings me back to one of the two most important tools for FMQ; Practice!
Before I conclude, let's not forget the other side of the speed equation: your hand speed. Hand speed is affected most by tension in your body due to the set up of the quilting space or fear that you will mess up. Make sure your set up works for you and allows good movement of the quilt. Some folks mention having a glass of wine to loosen yourself up, music can help find your quilting rhythm. I find listening to the sewing machine's motor helps me find the right speed for much of my quilting. Make sure your hands can control the top easily, whether you use gloves, lotion, a pinch, or something else. I use my Machinger gloves. A frequent break and stretch is good. I can get pretty tense from quilting too long and from being fearful that I will mess up. On important projects I pray before and during the quilting! And like most things you do with your hands, it takes practice.
Practice, practice, practice! I know that's not what you really wanted to hear. But it's what works. My next post will be on some ideas for practicing you speed control and practicing free motion quilting in general.
And that other tool I said many quilters might not want to hear? It's not really a tool per se, but it's hand-eye coordination. For some it is a natural ability or disability, but it can be improved upon. All it takes is.....practice! Get some time in on some good practice and find the balance of hand and motor speed that works for you.
Do you have any tips on speed control in quilting? Questions? I'd love to hear from you.
Speed is Relative when Free Motion Quilting

The speed at which you free motion quilt is all relative to how fast your machine is running and how fast or slow you move your hands.
If you've floored your foot pedal as some folks think you should, either your hands must move like a hyper squirrel or your stitches will be very small. If you run your machine at a snail's pace, you will have to slow your hands down in order to make even stitches that won't catch a toe.
You will find that certain shapes and sizes of designs you stitch in free motion quilting need to be done at different speeds than others. Longer, sweeping movements of your hands usually need to be stitched either at a faster motor speed OR you will have to slow your hands down. Tiny designs usually need to be done slowly.
It's a dance between your hands and your machine!
Join me for specific tips for finding your free motion speed sweet spot on Wednesday.
Quilt Design: Poured Out 2

Refining the lines on my newest quilt project and hubby says it looks like some sort of weather map.
That looks like just the thing for some beautiful medallion quilts! I like designing my quilts, but actually putting them together is a challenge. I really am all about the free motion quilting.

Amazingly, I had no cutting foul-ups! I cut this pattern (2 layers of freezer paper) out using an Exacto knife as all the curves would have driven me batty to cut with scissors. Plus it is hard to get a real smooth cut line with scissors. I could have used a rotary blade, but I feel like I have more control with the knife.
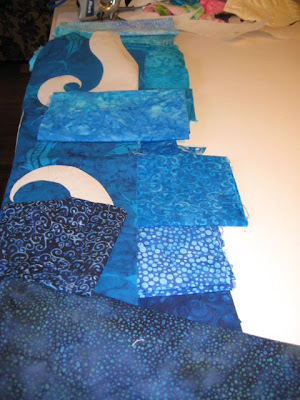

I was able to cut out and align several pieces last night (Instead of baking rolls for out Thanksgiving dinner. Oops! Sometimes I get started on a project and I just don't want to stop.) I am putting this together with my own variation of machine applique also known by some as appli-piecing. I could never piece these curves!

Thanksgiving is my favorite holiday, we have so much to be thankful for!
Subscribe to:
Posts (Atom)