I've finished quilting the quilt, except for the binding, and hope to get pics of it up on Friday. Right now, we're heading off to the wedding.

Sharing tips, tricks, and inspiration from my own free motion quilting adventure.
Cross-hatching Ruler Work on Sewing Machine
I've posted a new video showing some free motion ruler work I did while cross hatching an area on my latest quilt.
I've finished quilting the quilt, except for the binding, and hope to get pics of it up on Friday. Right now, we're heading off to the wedding.
I've finished quilting the quilt, except for the binding, and hope to get pics of it up on Friday. Right now, we're heading off to the wedding.

A Foot Workout
I've really been working my feet in the last few days.
Not my feet, but those of my sewing machine!
I wanted to make a skirt for my daughter's seventh birthday, since I couldn't find anything in the stores appropriate for a little girl, in my opinion.
We planned a butterfly themed party and I had found a shirt with butterflies and decided to make a ruffled skirt to go with the shirt.

If you make garments, you know that the standard clothes seam allowance is 5/8 of an inch. To help guide my seam, I placed a partial pad of sticky notes on the bed of the machine. I use more like a 1/2 inch seam, and it's handy to have that guide.

I also used my narrow hemming foot. I have a love/hate relationship with this foot. (I forgot to take a pic while it was on the machine) The fabric for the skirt was a voile cotton and was a bit thin. It hemmed mostly ok, but in some areas, the raw edge didn't get folded under all the way. I simply turned the hem under again and re-stitched. (I also used the ditch quilting foot (not shown) to guide that stitching so it would be a uniform distance from the edge of the skirt.)

I zigzagged the raw edges of the side skirt and underskirt seams, using the overcasting foot, above. The foot keeps the zigzag stitches from rolling the edges up as it stitches.

Then there's the beast of a foot, the ruffler attachment. This takes a bit of trial and error to get the fabric ruffled at the right rate, but for a ruffled skirt, it's awesome!
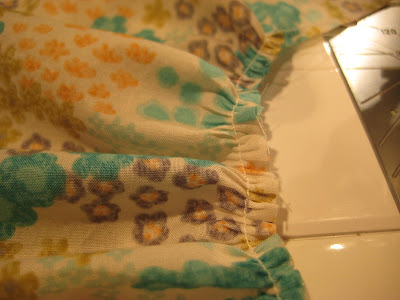
For working with ruffles, I work with the skirt in the flat, getting the ruffle on before sewing the side seams.

And here's the finished skirt on my butterfly birthday girl! I think the skirt came out great. It maybe needed a little more twirl factor, but she was pleased. I liked that I didn't have a bunch of folks ask if I made it. Unless I've made something pretty unique, when it comes to garments, to be asked that means to me that I've done some sloppy work.

Good thing my machine can't speak to me or it'd be saying "My feet are tired!". Now I can get back to quilting on the wholecloth wall hanging I designed as a wedding gift. We leave for the wedding on Thursday!
Not my feet, but those of my sewing machine!
I wanted to make a skirt for my daughter's seventh birthday, since I couldn't find anything in the stores appropriate for a little girl, in my opinion.
We planned a butterfly themed party and I had found a shirt with butterflies and decided to make a ruffled skirt to go with the shirt.

If you make garments, you know that the standard clothes seam allowance is 5/8 of an inch. To help guide my seam, I placed a partial pad of sticky notes on the bed of the machine. I use more like a 1/2 inch seam, and it's handy to have that guide.

I also used my narrow hemming foot. I have a love/hate relationship with this foot. (I forgot to take a pic while it was on the machine) The fabric for the skirt was a voile cotton and was a bit thin. It hemmed mostly ok, but in some areas, the raw edge didn't get folded under all the way. I simply turned the hem under again and re-stitched. (I also used the ditch quilting foot (not shown) to guide that stitching so it would be a uniform distance from the edge of the skirt.)

I zigzagged the raw edges of the side skirt and underskirt seams, using the overcasting foot, above. The foot keeps the zigzag stitches from rolling the edges up as it stitches.

Then there's the beast of a foot, the ruffler attachment. This takes a bit of trial and error to get the fabric ruffled at the right rate, but for a ruffled skirt, it's awesome!

For working with ruffles, I work with the skirt in the flat, getting the ruffle on before sewing the side seams.

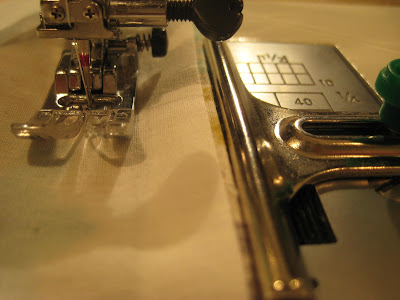
Then it's time for the waistband. Since I stitched an underskirt onto this nearly sheer voile, I used that as the facing for the band. So all I needed to do was stitch a seam to encase the elastic. I used 3/4 elastic, so I used this guide attachment to keep everything even and straight. It's not exactly necessary, but helpful.

And here's the finished skirt on my butterfly birthday girl! I think the skirt came out great. It maybe needed a little more twirl factor, but she was pleased. I liked that I didn't have a bunch of folks ask if I made it. Unless I've made something pretty unique, when it comes to garments, to be asked that means to me that I've done some sloppy work.

Good thing my machine can't speak to me or it'd be saying "My feet are tired!". Now I can get back to quilting on the wholecloth wall hanging I designed as a wedding gift. We leave for the wedding on Thursday!
Wedding Whole Cloth
Happy Friday! And it's a happy one for me as the hubby had gone out of town for work and was involved in an accident. He didn't get hurt, praise God, but had to stay gone two extra nights. He came back early this morning, happy day!
After showing you the applique project I was working on earlier this week, I had to stop to get started on a wedding gift for a cousin of mine. I designed a whole cloth wall hanging the old fashioned way, by hand instead of on the computer like the applique design. So much erasing! Actually, I had thought of it being a quilted pillow, but after thinking about her cats' antics, I decided a wall piece would be safer.

Above, I have finished the design and have gone over the final lines with a Sharpie in preparation for making a mirror image tracing. You should have seen all the stray and discarded pencil lines there were before I started erasing them.

There's a full-width version, above, and now to transfer the design to the cotton sateen I will be using.

Using a dark Sharpie on the pattern allowed me to see the lines very clearly even without using a light table. That funny rectangular shape will hold the date of the wedding. I had originally designed a traditional feathered wreath with the doves at the top, but I realized that the feathers and doves would blend together too well and wouldn't 'pop'.

I started some stitching and I can already see that the wool batting and the design are going to work well together to give this piece some nice textural interest.

I will be quilting very densely around the doves, ring, and scroll work. Then I will play with some fun fillers. Following all these marked lines is not my favorite quilting activity, but I wasn't about to free hand such a symmetrical design.

I do have to remind myself that it will look much better after the markings have been removed with a water bath. Above, I didn't stitch all the way between the first two petals of the flower, but decided it looked better stitched all the way down, so I will have to go back and stitch that line on the left.

Just with some light echoing the flower is beginning to pop. I will be doing some ruler work on this piece just like the big boy (girl) long armers do. I really like using long arm rulers on my domestic sewing machine.
My hubby came home with a $5 flatbed scanner he picked up at Goodwill, so there's a chance I will make this into an actual pattern to share/sell.
I'm linking this post up with Nina Marie's Off the Wall Friday and Leah Day's Free Motion Friday. Then it's time to get back to stitching, this time I've got a skirt to make for my favorite birthday girl! I'm not much of a garment sewer, but I am so glad I can make my sweet Boo a decent twirly skirt and an occasional dress. What clothing that is available for a size 7 girl these days is not pretty.
After showing you the applique project I was working on earlier this week, I had to stop to get started on a wedding gift for a cousin of mine. I designed a whole cloth wall hanging the old fashioned way, by hand instead of on the computer like the applique design. So much erasing! Actually, I had thought of it being a quilted pillow, but after thinking about her cats' antics, I decided a wall piece would be safer.

Above, I have finished the design and have gone over the final lines with a Sharpie in preparation for making a mirror image tracing. You should have seen all the stray and discarded pencil lines there were before I started erasing them.

There's a full-width version, above, and now to transfer the design to the cotton sateen I will be using.

Using a dark Sharpie on the pattern allowed me to see the lines very clearly even without using a light table. That funny rectangular shape will hold the date of the wedding. I had originally designed a traditional feathered wreath with the doves at the top, but I realized that the feathers and doves would blend together too well and wouldn't 'pop'.

I started some stitching and I can already see that the wool batting and the design are going to work well together to give this piece some nice textural interest.

I will be quilting very densely around the doves, ring, and scroll work. Then I will play with some fun fillers. Following all these marked lines is not my favorite quilting activity, but I wasn't about to free hand such a symmetrical design.

I do have to remind myself that it will look much better after the markings have been removed with a water bath. Above, I didn't stitch all the way between the first two petals of the flower, but decided it looked better stitched all the way down, so I will have to go back and stitch that line on the left.

Just with some light echoing the flower is beginning to pop. I will be doing some ruler work on this piece just like the big boy (girl) long armers do. I really like using long arm rulers on my domestic sewing machine.
My hubby came home with a $5 flatbed scanner he picked up at Goodwill, so there's a chance I will make this into an actual pattern to share/sell.
I'm linking this post up with Nina Marie's Off the Wall Friday and Leah Day's Free Motion Friday. Then it's time to get back to stitching, this time I've got a skirt to make for my favorite birthday girl! I'm not much of a garment sewer, but I am so glad I can make my sweet Boo a decent twirly skirt and an occasional dress. What clothing that is available for a size 7 girl these days is not pretty.
Applique Design and Stashed Treasure
I hope you've had a lovely Labor Day weekend if you live in the states. Poor hubby worked, but the kids and I decided to take a day off from school. Monday afternoon did find us laboriously cleaning out a closet that holds most of our arts and crafts supplies, games and puzzles. What a mess!

I've turned my hand to trying some fairly traditional applique. I think applique work might give my free motion quilting skills a better chance to shine. I am working on a wall quilt to hang at the quilt shop (Threads Run Through It, Phenix VA) that wants to promote me as a quilter for hire and where I will begin teaching free motion quilting classes this winter.

I am learning to use a graphics program on the computer to design the applique. It's a bit of a steep learning curve, but I'm starting to get the hang of it. Above is the first flower of the design. I haven't quite decided what background fabric to use yet. Maybe something lighter than what it's sitting on right now.

Preparing the shapes. This little iron is so handy for turning the edges under! I nearly tore my stash and storage area up, trying to find the thing. I could visualize the basket it was in, along with other items in the basket. But could not find the basket!
Turns out, the basket was inside a nearly empty tote. I did come across several nice pieces of fabric I had forgotten about as I searched. Amazing how I can find treasure just by stirring the stash occasionally!
I challenge you to stir through your fabric if you've neglected it for a while and see what treasures you can come up with!

I've turned my hand to trying some fairly traditional applique. I think applique work might give my free motion quilting skills a better chance to shine. I am working on a wall quilt to hang at the quilt shop (Threads Run Through It, Phenix VA) that wants to promote me as a quilter for hire and where I will begin teaching free motion quilting classes this winter.

I am learning to use a graphics program on the computer to design the applique. It's a bit of a steep learning curve, but I'm starting to get the hang of it. Above is the first flower of the design. I haven't quite decided what background fabric to use yet. Maybe something lighter than what it's sitting on right now.

Preparing the shapes. This little iron is so handy for turning the edges under! I nearly tore my stash and storage area up, trying to find the thing. I could visualize the basket it was in, along with other items in the basket. But could not find the basket!
Turns out, the basket was inside a nearly empty tote. I did come across several nice pieces of fabric I had forgotten about as I searched. Amazing how I can find treasure just by stirring the stash occasionally!
I challenge you to stir through your fabric if you've neglected it for a while and see what treasures you can come up with!
Subscribe to:
Posts (Atom)