Showing posts with label Janome. Show all posts

Troubleshoot a Change in Sewing Machine Tension

A student recently emailed to ask:

I bought a M7 in April. My tension was perfect I didn't have to adjust the tension. Now after 51 hours of quilting my back tension is loose. I have to put it on 3.8 is this normal? I sew on a HP foot

Fine Tune that Thread Tension

It totally can be! The auto tension is just a starting point, especially if using different threads or certain stitches. For instance, the machine will increase your top tension if you set it up through the applications menu for free motion quilting. But if I decide to use a thicker thread than usual (ie: switch to 40wt Aurifil instead of the 50wt I piece with) I might not need the top to be tighter. A slippery, high-shine embroidery thread paired with a spun polyester might not react the same to the tension setting that works great for top and bottom of the same type of thread.

Troubleshoot that Tension Change

Specifically, you are using the HP foot, which means you are just doing straight stitch. You've said your top tension is loose, so that tells me you were seeing bobbin thread on the top and so you reduced it to 3.8. Sometimes needing to loosen the top tension on your standard thread combination for a commonly used stitch, like the straight stitch can indicate that the machine has some lint build up in the tension discs, making it harder for the thread to go through....hence the need to decrease tension. Frustratingly enough, sometimes a wad of lint will cause a lack of tension.

If you consistently find that the tension needs to be changed about the same amount each time, you can go into your settings and change the master tension. On these all digital machines, the numbers tend to be lower for tension than on our more manual Janomes which tend to run at balanced tension on regular sewing thread of 3-4-5, with 4 to 4.5 the most common for most regular sewing threads.


Lock the M7 before threading

Lock that Sewing Machine

Additionally, make sure you are 'locking' your machine for threading. This is something that machines like yours with the automatic presser foot lift must do when threading the top. (Janome 15000, 14000, 12000, M7, M17, 9400/9450, S9 and S7. I'm sure other brands with this kind of system have something similar) It tells the machine to OPEN the tension discs so that the thread can go between them properly. With the automatic presser foot lift being controlled by an electronic servo motor, the traditional link between the presser foot lever and the tension discs isn't as direct as on a simpler machine where threading with the foot up opens the discs. While an extra step, it is totally worthwhile.

Preventative Maintenance for your Sewing Machine It could also be time for a service. 51 hours doesn't seem like a lot, but it actually is! That is actual sewing time. The difference between hours on and time sewing can be ridiculously different. All depends on how you sew. Having bought in April, you are coming up on your 1 year anniversary. A service person can adjust the tension manually, so that it is balanced, without you having to change anything.

Self-Care for your Sewing Machine

Also, if there is lint in the tension springs of the bobbin case, that can cause the bottom tension to be loose. Here's a video that covers this issue below.


By the way, if you enjoy my videos on YouTube, I'd be so grateful if you'd give them a Like, share them with others, and don't forget to subscribe so you don't miss new ones.

Adjust the Bobbin Tension?

Finally, any changes you make to the bobbin case tension will also affect the top tension. It's a balancing act. Typically, we can get a good balanced stitch by just adjusting the top tension. Using 12wt or larger thread in the bobbin call for loosening the bobbin and 80-100wt thread calls for tightening the bobbin. Otherwise, the top can balance it.

Find Janome Education in the AmyQuilts Clubhouse

Want to learn more about your higher-end Janome machine so you too can learn to use it with more creativity and confidence? Want to know how to use all the "bells and whistles?" Check out the AmyQuilts Clubhouse program. Divided into one for sewing and one for embroidery, it's a monthly membership program with a ton of lessons and access to me as a "virtual Janome dealer."

Best wishes for happy stitches,


Binding Quilts with the Janome Quilt Binder Set

I love to free motion quilt my quilts, but once I get done quilting them, especially if I've gone a little over the top with ruler work and dense fills, I tend to stall out on the binding. So I finally got around to using the Janome Quilt Binder Set.

I am totally in love with the quilt binder set! It's perfect for just getting these quilts bound and done. And I'm a big fan of done over perfection any day.

People usually wonder, "What about the corners?" Well, I think my corners are possibly better than my usual traditional method. I've got a pictorial tutorial for you and I will hopefully follow up with a video at some point. (This is not the easiest process to get good video footage while still getting my hands where they need to be.)

turning the corner with the quilt binding attachment
Four fabulous corners and #2 is where I joined the beginning and end!
This is the Janome Quilt Binding Set, not to be confused with the simple binding foot, which can't handle the thickness of a quilt but does a great job with binding raw edges of garments or making thin straps. If you have something other than a Janome, check with your dealer as I would think some of the other brands would have a similar product.

Janome Quilt Binding Set
It attaches to the machine, in part, by replacing the bobbin cover door with the base of the binder set, so it's important to get the right one for your machine. It's only meant for the bigger machines as you've got to have some room to work.

feeds the binding onto the quilt

It does a half inch binding using a 2 inch strip of fabric. There are other binders that are compatible that do different sizes, but you need the base from this set to make them work with means another purchase, which can get spendy. So just stick with this one unless you've got your own sweat shop going.

I cut my strips 2 inches wide and join them with 45 degree seams, then press to one side. I've tried to press them open but the binder just pushes them to the right as it is fed through, so to one side they go. I also make sure to load it with the seam allowances going to the right.

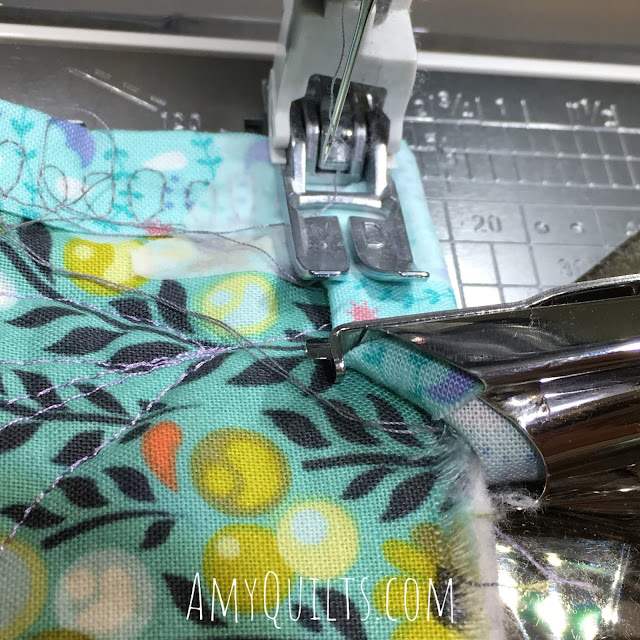
 As you can see in the above picture, the attachment wraps the binding around the edges. That 90 degree positioning/fold of the binding really helps get the quilt fully into the binding. There are several adjustments that the various screws allow you to make, including angling it for a curved edge and making the bottom fold stick out further than the top fold of the binding.

It comes with a foot but I chose to use my narrow Acufeed Flex Foot (a built in walking foot that is perfectly synchronized to the regular feed dogs) for more even feeding of the quilt layers and binding. It works fabulously together.

You can use a straight stitch but using a decorative stitch ensures that you'll catch both edges of the binding for sure.  In these two samples, I used pretty wide stitches because they looked great with the quilts, but I have used a narrow serpentine stitch, blanket stitch, and straight stitch with great results.

When you get to a corner, you stitch right up to the edge. Then you lift the foot and pull the quilt straight back about 10-12 inches (away from you) and put the foot back down on top of the binding and finger press the folded binding hanging out the back of the machine. Don't skimp on how much you pull through the back or you won't have enough to comfortably work with.

turn the binding around the corner

Then you fold the mitered corner down in front and secure with pins or tape, then the same for the back.
Kimerbell tape to secure

I now prefer Kimberbell Tape to do this. I do not sew over pins and when using them, as soon as I took them out, it would shift. I can sew right through the tape and it picks out easily without gumming up my needle or fabric.

Kimberbell tape on the back

Then you pull the quilt towards the back and insert into the extra binding that was pulled out. Then you carefully pull the binding backwards through the binder attachment, moving the quilt backwards as you go, until you are at the corner ready to continue stitching.

Gently pull until the binding encases the edge and you are back at the corner

Since I use the Kimberbell tape, I don't have to futz with pins. Just start stitching again. For the record, I wouldn't use any other brand of tape for this even it it does look like paper bandage tape. It's been made for stitching through.

turning a corner with the Janome Quilt Binder Set

And how do I join the ends of binding? There are a couple of different methods, but I am now a fan of joining the ends at a corner! This means I can use the binder as much as possible. If I joined along a side, I'd have to wing it to secure the binding on either end of the join.


 So I just hand tuck the raw ends to make a nice mitered corner and stitch it down. If I stitch all four corners down at the miters, it would be super duper hard to tell the difference. My friend and one of my favorite customers, Ann, took a look at this quilt and totally approved.


Because the attachment covers the bobbin cover door, you'll want to start with a full bobbin. Learn from my experience! Also, I don't recommend using a super complicated decorative stitch for this reason; uses more thread.


I wouldn't use this for show quilts, but if you want something to help get quilt binding done, this is fabulous. Great for charity quilts, utility quilts, and in my case, shop samples. I know some will say they prefer to hand bind, that's it's relaxing. I actually agree, but I am strapped for time and this helps.


My daughter is certainly happy to finally have her first quilt done. She pieced these 10" squares together and then we split the quilting. We each quilted every other block, and then it sat....waiting for its binding. Now it's all done!

Now, it's not cheap. But time is priceless. Many dealers don't keep the binders in stock because of the price, but I do, now that I've seen how easy it is to use. You can find the Janome Quilt Binder Set over at AmyQuilts.com in two versions for different machines.

Finally, yes, I'm back to blogging here. Turns out our online shop's blogging platform makes it difficult to format a decent article and more importantly, it didn't allow me to respond directly to comments! That's a total deal breaker, so this will become the blog for all of my sewing and quilting adventures.

Janome Quilt Binder Set

I have tried out the Janome Quilt Binder Set recently, and I think this might be just the tool I need to get more of my sample quilts, as well as utility quilts bound up in a jiffy! I seem to stall out at the quilt binding stage, but with a little more practice, I'm going to get caught up.


 Now, there are a couple versions of this binding set for different machines. I had one that came with the existing inventory when we bought the shop. It was rather old and the packaging showed it. It's not a cheap tool, so I knew I'd have to play with it if I was going to prove that it was a worthwhile item. I set it aside and there it sat.

When I got it out finally, I discovered it was made for the bigger 7mm stitch width machines like the 6600P, MC7700, 11000, and the like. I didn't have any of those machines in the shop so I tried it on a smaller 7mm machine, the 4120. It fit that machine, but just barely. It was a little hard to maneuver.


But after just one test quilt, I went ahead and ordered the set that would fit on my 15000 and other Janome 8mm stitch width machines, like the 8900, 8200, 9400, etc.


Corners were easier than I expected. However, once I moved to a real quilt, I had trouble lining up the edges of the 1/2 inch binding to get it to stitch down perfectly, all in one pass. I do think trying to work under the small space of the 4120 was partly responsible.


I was able to stitch the entire binding down, including all four corners in 57 minutes! That didn't count for the final joining of ends, and I missed the binding in a few places, but overall, it's definitely worth doing it enough to perfect the technique!

I'll keep you posted on this tool and whether I think it's worth the investment.

Also I am happy to announce that the Ruler Work Upgrade is now available for the Janome 9400. The demand is great and it's getting into an out of stock item quickly. In fact, Janome is sending me a loaner machine so I can shoot videos of the ruler foot in action and it's been put on backorder! If you have the 9400 and want to do ruler work....talk to your dealer asap! Yes, it's totally worth it! The software update will make it impossible to clunk your ruler foot and your needle clamp together. Janome is the only machine on the market with such a foot and feature.

By the way, many of you have asked about the Glide thread that I use for so much of my quilting. I sell it online, but have yet to list it in as many colors as we actually have at Sew Simple of Lynchburg. But I an excited to share that we now carry the Angela Huffman Glide Thread Collection. Ten cones at a great price in a handy storage case. You can order it at Amy's Quilting Adventures.

Janome 9400 Ruler Foot and Upgrade


So many people have been asking me about a ruler foot for the 9400 and I can finally let you know that it's almost ready to launch. Dealers have already gotten this information, so while I can't really tell you all about it until the public launch, I can tell you its on the way and I'll give you full information about it shortly!

Amy's Newest Quilting Adventure: Artistic SD16

I've always been a little leery of moving up to a bigger machine when it comes to sharing free motion quilting, ruler work (quilting with rulers), and offering up tips for machine quilting. Especially as I know most of my readers and students don't have huge machines.

But when it comes to quilting big quilts, there's no denying that bigger machines sure help. I hear from many folk that they've taken the plunge to a long arm or a larger domestic machine mounted onto a frame system. Some are delighted, others...not so much.

Artistic SD16

A sit down long arm breaches the divide for me. I don't have room for a long arm on a frame, I certainly don't have the budget for one, and I'm a confirmed "quilt pusher!" I don't have to change or adapt my free motion quilting skills to switch to this machine.


We've got a very large and active long arm dealership in our area, so even if I wanted to AND had the room, I'm not sure I'd bring in the new Janome long arm machines, though they are getting great reviews (they're no longer the Tin Lizzy clones). Plus pushing my quilts to quilt them is my forte, so it makes sense to stick with what I know best.

We've brought in the Artistic SD 16, which has a ton of room and also sits in the same orientation as a sewing machine. I love this! I can reach all parts of the machine with ease and I can push a quilt right to the back without running into the body of the machine.

It comes standard with a stitch regulator too. This is a big help for those with less experience with free motion quilting. My daughter loves the feature. Yes, I've been letting my 11 year old use this machine, with stern instruction to keep her fingers away from the needle.


I haven't spent a lot of time on the machine, being insanely busy keeping the shop all stocked and cute for the Christmas season and keeping customers happy. While my daughter loves the stitch regulator, I'd rather go without. But I'm trying it anyway as we plan on renting time on the machine for interested customers. I insist on knowing my machines!

Turns out that if you're experienced in free motion and used to slowing down your hands if the machine slows down while the stitch regulator slows the machine down if your hands slow down, you end up in a bit of a stand off!


The black button on the quilt above (my daughter's first big quilt) is resting above the stitch regulator which works much like a wireless computer mouse to tell the machine what speed to run at based on the regulator's motion. This is much different than the stitch regulator on a frame based long arm.


I've heard before that many long arm professionals prefer to work without the regulator and when I recently posted on Instagram about my stitch regulator stand off, I got several comments along the same lines from quilters using a sit down machine. Glad to know it wasn't just me or a problem with the machine.


It's been interesting using designs at a larger than usual scale for me. But the intricate quilting I love to do on my sewing machine isn't the thing for a nice cuddly quilt. These are 9.5 inch squares and I'm putting one large feathered flower in every other block. My daughter is planning on doing the rest of the blocks herself.


Above is my beautiful, creative, stubborn daughter. She's also apparently freezing. I swear our shop is a nice temperature, but you can't prove it with this picture. She helped with the basting of her quilt too. I'm looking forward to seeing her stitch on her quilt too. She seems to feel better about doing it on this machine than she does on any of our sewing machines. I'll keep you posted.

How about you? Have you tried these sit down machines? Are you using a stitch regulator?  Is anyone disappointed that I keep going up to bigger machines? 

By the way, if you are local to Lynchburg or within a reasonable drive, we are having our Christmas Open House Event this coming weekend (Dec. 8 & 9) with demos, sales, snacks, complementary scissor sharpening with minimum purchase. (Limit one free sharpening) We've got great deals on machines and exceptional support and service.


A New Janome Ruler Foot

Janome was the first sewing machine brand to have a ruler foot, and while it was originally intended for use on a frame mounted machine, quilters far and wide began using this combination of feet on regular, stationary sewing machines.

As I've shared my quilting adventures with ruler work here for over 7 years, so many people have enjoyed the technique, whether on a Janome or a compatible machine.

In the last few years, machines have been created with an automatic presser foot mechanism which is super duper awesome for sewing, but Janome did not approve of using the Janome ruler foot combination with these machines. Plenty of determined quilters used it anyway, though it wasn't approved, nor ideal.

Just last year I was in Cincinnati Ohio at a Janome training when they introduced the Janome 9400, which has an automatic presser foot lifter. I was talking to my Janome rep about the ruler foot when Shin Yamamoto, President and CEO of Janome America came over and asked what I thought of the new machine. I explained that I thought it was fabulous for sewing but because I loved to do ruler work and the Convertible Free Motion Foot set wasn't approved for the model, I wanted to see a ruler foot for these machines.


Fast forward to earlier this week and I'm in the same hotel conference room and Janome announced than not only was there a new version of the Memory Craft 15000, called the Quilt Maker 15000 that had a ruler foot and a ruler work setting, but there was also to be a free upgrade to previous versions of the 15000 that would make them compatible to the new ruler foot and several other new feet!

Janome Quilt Maker 15000 ruler foot


 The new foot and ruler work menu settings make quilting with rulers substantially easier to set up.

Janome Quilt Maker 15000


It gets even better! Janome is working on updates for the other Janome machines that have the auto presser foot lift (MC14000, 9400, S7, and S9). The update is a free one performed by your dealer, the new feet will not be free. (The update will also have a replacement part for the needle threader on the older 15000 versions, to make it work better.)

Ruler work was all the talk during our dealer training. Janome is motivated to get these new upgrades and feet out asap!

The new feet (ruler foot and a few others) aren’t quite available to dealers yet, other than those that come with the new 15000, which I have sitting in my studio! I was told that the update for the 9400 should be ready in a few months.

I’ll keep everybody updated as I can.


Meanwhile, I'll be playing with my new 15000. I used it for the very first time while demonstrating ruler work to students in my Quilting with Rulers class here in the shop. It was fabulous! No more worrying to remember to put the foot down before putting down the needle or making sure the needle is up before raising the foot. It's got a ton of other nifty features, but I'll save that for my shop's blog.


The foot is super! It's smooth, rounded on the bottom and has a good sized divot at the front to better see at the needle. It attaches directly to the presser foot bar, so there's no spring part in the way. You adjust its height through the ruler work menu. This gives it great visibility.

This will likely be the machine you see me use in my tutorials from now on, unless I'm doing a test of a new low shank ruler. This means my beloved MC8200 is for sale as a used machine. I'm not sure what the protocol is for a dealer selling a used machine and listing the price online so if you're somewhat local and looking for a fabulous machine for quilting with 11 inches to the right of the needle, you can call the store (434-239-6708). Not that we couldn't ship this machine where ever, but I feel weird about selling a machine far enough away that we couldn't support it well as the dealer. Having a local dealer is sooooo important. (BTW, we are also selling a new sewing/embroidery machine, the MC14000 at a smoking hot price that I can't list online, as it's being replaced by the 15000.)

I am so happy to see that Janome has listened to its dealers and customers and are making these changes so these higher-end machines also have a great ruler foot. I was blessed enough to have an opportunity to remind Shin that I had asked for this very thing in the same spot last year and how happy I was to see it and thanked him.

If you have a Janome without the auto presser foot lift, the new foot isn't for you. Stick the the convertible set and ruler foot combination.

Quilt on!

Quilting with Rulers: Ruler Foot Issues with Auto-Lift Presser Feet

Hello dear readers and quilting friends, I think I and my kids are recovering from our winter cold, flu, plague, pink eye (yes, pink eye. Thanks kids.) mess. I figure I better post something here on my slightly neglected blog before y'all forget about me.

You know how passionate I am for free motion quilting with rulers. So when I heard that Janome Canada did not recommend the ruler foot be used on the Janome S7, MC12000, and MC15000 I wanted to figure out why. I'm pretty sure I have sold the Janome ruler foot combination to owners of these machines and haven't had anyone come back with problems, so what was going on?

Since I work in a Janome dealership, I had access to the S7 and shot a video with my new iPad mini. The mini made editing my video a lot easier than I have been doing it before, so hopefully I will do more videos as soon as I get a camera mount for it.


Watch the video first, but the main issue is the ease of which the presser foot can be raised because these machines have an automatic/electronic presser foot lifter system. It's still an aspect of the lack of clearance between the top of the thick edge of the ruler foot and the bottom of the needle clamp. As always, with any ruler foot, make sure the foot is down when the needle is down and conversely, don't raise the foot when the needle is down.

With this electric lift, it's very easy to accidentally fail to follow this cardinal rule of ruler foot use. Janome Canada says they will not cover any damage to these machines (S7, 12000, and 15000) if you use the ruler foot on it. (I haven't heard anything from Janome America.) I believe the damage would be that of throwing the machine out of time, but I am not entirely certain. This isn't a huge issue to fix, but we don't want to take the machine to the shop.

I think it's doable to use the ruler foot with these machines but that's a risk you've got to decide to take for yourself. I wouldn't want you to do anything to needlessly risk your machine.

My ruler work blog linky party is still open and we've had some incredible work shared through it, so go visit the participants and if you've got a post to share on ruler work, now's the time to do it!

Of Westalee Rulers, Ruler Thickness, and a Giveaway


Yesterday was my day for the Craftsy Instructors' Blog Hop and I announced my own giveaway of two prizes. One entrant will win a Westalee Ruler Foot Starter Kit and another will win 3 rulers, also from Westalee. Both prizes are courtesy of my shop, Amy's Quilting Adventures. You can enter this giveaway and the Craftsy giveaway here and the winners will be chosen December 14th. (Giveaway is closed.)

Take a few minutes and visit the other stops on our blog hop:

Monday, December 7 
Jackie Kunkel  - Canton Village Quilt Works 
Kate Colleran - Seams Like a Dream   
Tuesday, December 8 
Wendy Gardiner - I sew  
Wednesday, December 9 
Maureen Cracknell - Maureen Cracknell Handmade 
Thursday, December 10 
Jan Newton - Newton Custom Interiors  
Friday, December 11 
Laura Nownes - See How We Sew  
Saturday, December 12 
Kelly Ashton - Kelly Quilter  
Sunday, December 13 
Lindsey Stephens - Poetry In Yarn  

This ruler giveaway is a great time to talk about rulers and ruler thicknesses. It's a lot more complicated to choose rulers now than it was when I first adapted this technique for use on sewing machines. It's not a bad thing, having greater choice and new designs is fabulous.

The first rulers available were 1/4 inch thick rulers for use on long arm machines (more or less, the QPC rulers I carry are slightly thinner). They're still great rulers and fairly good to use to the front and sides of the foot on a domestic machine. Many high shank machines can use them behind the foot as well. They're easy to grip in the hand and are nearly indestructible.

Enter Aussie company Westalee into the mix. They had been making long arm rulers and tools for some time when they saw the potential of the domestic machine market. They were willing to not only design a ruler foot that would work on a vast range of machines, but also to cut rulers from thinner stock.

 Now, if a quilter were to only get their rulers from Westalee or a Westalee-only retailer, ruler thickness choice could be very straightforward. You buy the rulers they sell for the foot you've bought from them. Low and medium shanks use the 3mm rulers while the high and high shank special shanks use 4.5mm.

But at the same time there was this American quilter who was playing around with a Janome ruler foot and sharing how it could be used to quilt with rulers on sewing machines. She didn't want anyone to damage their machine so she stuck with the conventional long arm wisdom of not using rotary cutting rulers to quilt with. This was because long arms have feet that hop and because even a non-hopping Janome ruler foot could be set too high off the quilt top and possibly allow the ruler to slide underneath the foot. Cutting rulers are 3mm, as are the thinnest Westalee rulers.

That American is me and I've taught a lot of people to how to use rulers to guide their free motion quilting on a variety of stationary machines. I admit it, I have a bias against the 3mm rulers. Maybe it's unjustified, but as I teach those who use the Janome ruler foot as well as the Westalee foot, I think my guidelines are sound. Read on to see why I prefer the 4.5mm rulers and also where you might still want the 3mm if you have a low shank machine.

Westalee ruler foot (left) and Janome ruler foot combination seen from bottom.

The Janome ruler foot (one half of the Janome Frame Quilting Foot Set, mounted on the Convertible Free Motion Foot Set) has a smooth, curved, cup at the bottom of the foot, as well as a spring adjustment for height. This makes it very easy to adjust the height and also allows it some give when hitting a thick bulky seam. It also means that there's a potential for the 3mm rulers to wedge underneath the foot.

I love the option of the 4.5mm thick rulers! They're easier to grip in the hand and feel sturdier than the 3mm rulers. They fit under the presser foot bar of nearly all low shank machines, yet are a substantial thickness against the edge of the ruler foot so they won't slip under the foot.


 In both of these pics, the foot is adjusted too high on the machine in order to show the presser foot bar peeking out from the bottom. Above is the 4.5mm ruler in quilting position, below is the 3mm ruler in position.


The measurement from the bottom of the Westalee Low Shank Ruler foot to the bottom of the shank portion that attaches to the presser foot bar of a machine is 1/4 inch (6mm) so it appears there is plenty of room for a 4.5mm thick ruler to run all the way around the foot. And this is the case for many low shank machines. With my low shank Janome 3160 used in these pictures, I can even use the Quilted Pineapple Curves rulers which are 5mm.

In talking to the folks at Sew Steady, the distributor for Westalee here in the states, as long as even one low shank machine can't fit a 4.5mm ruler all the way around the ruler foot, they're going to recommend the 3mm rulers for all low shank machines. It makes it easy for them to just make that recommendation.

So when might a 4.5mm ruler not work with a low shank ruler foot?

  • When the presser foot bar sticks out from under the bottom of the shank portion of the Westalee low shank foot. This might only happen on some machines when using a thick batting and the foot has been raised higher. It could be the case for some machines all the time. Remember, this issue only affects use of rulers under the presser foot bar, behind the foot where we don't place a basic ruler most of the time. It is an issue when using interior shaped rulers or specialty rotating rulers on machines with this set up.
Here you can see the foot is set very high on the shank and the presser foot bar is poking out from below. It's actually too high to quilt in this position, but done as an example.
  • When the hand screw for the shank attachment is excessively large. So far this issue actually has happened to at least 2 of my students and from details given to me by one of them, they had room for the 4.5mm rulers under the screw, but had 1/4 inch rulers they wanted to use. This might not always be the case, the 4.5mm might not fit on these machines with a thick batting.


I actually find the second scenario more troubling than the first, as to the left of the foot is a prime position for working with rulers. In the latest case, it was a Singer S18 machine. This is a clone of the Janome 6500. (I've got a few possible solutions and adjustments for this issue that I'll save for the end of this post for those who are interested)

It is important to note that since I began selling the Westalee products in September, I haven't had a customer tell me they couldn't use their 4.5mm ruler with their low shank machine. Whether that means they couldn't fit one behind their foot completely, I don't know. I think the number of machines who can't is pretty small.


In the examples in this post, I'm using a Hobb's 80/20 batt which is a fairly thick batting. Immediately above and below, I've doubled the sample for explanation purposes while the foot remains set on the presser foot bar in the highest position possible. (On this Janome 3160, I could have reduced the presser foot pressure and drop the foot down for a bit more room.) You can see below that this set up leaves very little room for the 4.5mm ruler behind the foot. That's some seriously thick batting! Even thicker than using one layer of 80/20 and a layer of wool.


The same guideline that makes it easy for Westalee to recommend the different thickness of rulers, makes it hard for me to carry a good selection of rulers in both sizes (I'd have to nearly double my inventory), plus the thicker rulers from other manufacturers. My preference to sell the 4.5mm rulers has made it a little harder for Westalee. I've talked to the folks there and they do get some "Amy said..." questions, but they don't hold it against me too much. They know I'm selling to a variety of customers using a variety of feet and give them a lot of free press. I'm not an affiliate, nor do they pay me to promote their stuff, so I'm free to give my full opinion.

Here's the Westalee Ruler foot in the proper position for quilting on this sample with Hobb's 80/20 using the 4.5mm ruler. Plenty of room.

I like to carry rulers that I've actually used frequently and I keep it to a fairly basic but very useful assortment. So far there have only been a few rulers with an interior shape that low shank machine users might prefer to have in the 3mm thickness. I am now adding that option. I will also be adding some other Westalee rulers that will wrap around the foot and I will stock these in both thicknesses.

I do my best to give detailed descriptions of the products I sell so that you can make informed decisions. If you have concerns about the suitability of a template or ruler for your machine (or the ruler foot) just send me an email at amy@amysquiltingadventures.com

Additionally, if there's a Westalee product that you're dying to have and it's not listed in my store, I can place special orders!

Now, about that large screw of the S18 and Janome 6500. There are 3 options plus a tweak:

  • replace the screw with something with a smaller head. You may be able to get one from a sewing machine repair center or even a good hardware center.
  • Buy thinner rulers.
  • Alter the screw- A recent customer had her husband file the thumbscrew portion down! She was serious about wanting to use that Double S ruler and I admire her willingness to think outside the box.
  • The tweak: make sure the presser foot pressure is reduced as much as possible and lower the ruler foot to a lower position. This is a useful tweak for all low shank machines if they've got this feature.

That's all I have on ruler thickness, but I'm open to questions! Hit me up in the comments. I'd also like to hear from anyone that has a low shank machine that can't use the 4.5 rulers well with their low shank machine. Let me know what brand and model you have as I'd like to create a list.

Free Motion Quilting Practice: Feathers Top to Bottom

Yesterday I shot a video demo for the folks at TopAnchor Quilting Tools. They make these incredible rotating specialty templates for quilting with a long arm. Since I started using and teaching about using rulers and templates to quilt with stationary machines, many of their products have also been sold to users of (mostly high shank) sewing machines and sit-down long arms.

I showed how to use their Baptist Fan template. It's a very tricky template to use on a stationary machine, but they tell me that there have been plenty of quilters curious about how to use it on a stationary machine, so a video is one of the best ways to show it.

I'll be uploading that video to YouTube shortly, but in the meantime, I used the sample to do a bit of free motion quilting practice. I got home from work dead-dog tired. I love working at the Janome dealership, and am full of enthusiasm when I'm there, but I am an introvert and I kinda crash after a full day there.

free motion quilting feather practice
Those arcs are made with the Baptist Fan template

Doing some completely free quilting, no need for a finished project, helps fill my batteries! I grabbed the sample and began to use the stitched arcs as feather spines.


Free motion quilting practice feathers
Feathers, made from bottom to the top.

It wasn't long before I reached the top of a feather and decided I really need to practice stitching feathers from the top down. I always, always stitch my feathers from the bottom to the top. It means planning ahead to how you will get from the top of a plume to the bottom to finish out the other side. But I know there are talented quilters who can do feathers 'backwards' so I decided to give it a try.

practicing stitching feathers from top to bottom
First run of 'backwards' feathers, going from top to bottom of the spine.
In the picture above, my seam ripper is pointing down the feather in the direction I stitched. (No cute pointer hand this time; my son took it with him to Grandma's house!) The first plume wasn't bad as there was no other plume to fit it against. Then I was committed. It was a bit wonky after that, but like everything, it got better (mostly) with practice.

practice free motion quilting designs feather plumes
Not too bad. Everything gets better with practice.
The last two rows of plumes were stitched backwards as well. Some were pretty wonky, but it wasn't too horrible. I tried to picture in my mind what the whole plume looked like as I stitched. It was hard to keep from over-doing the lower curve of each plume and to get the area where the plume met the spine from being to wide and straight. But it was good practice.

I like to think of such practice as good exercise for my brain. I wrote about how quilting is good for preserving the gray matter in my newsletter that came out this past Tuesday. You are signed up for my newsletter, aren't you? You can sign up over on the right sidebar.

I'm sure some of you will wonder if I will carry the Baptist Fan template in my shop at Amy's Quilting Adventures. While I aim to provide a great collection of rulers and templates for ruler work, right now I'm not carrying it. As I said, it is very tricky and probably best suited to long arm systems (sit down or regular) but you can certainly buy it through TopAnchor.

My question to you is: What ways are you challenging yourself in your quilting practice? Are you trying new shapes, threads, designs? Maybe you are wanting to try ruler work (You should check out my class at Craftsy- Quilting with Rulers on a Home Machine!) or even try a new piecing technique.

Let me know in the comments what you are doing to stretch yourself when it comes to quilting or creativity.

Frame Quilting Foot Set, aka Ruler Foot

Something came across my desk at work this week from Janome that made my day. So many of my Janome (or Janome foot) using friends have still been running into Janome dealers who tell them the Ruler Foot in the Frame Quilting Foot Set is only for the 1600P. Not so! I did get official word of approval from Janome on the use of the ruler foot about 18 months ago with all the Janome Convertible Free Motion Foot Sets, but there were still dealers that didn't know.


This week, Janome released a new document to showcase all the Janome accessories and this picture above was part of it! Yay! We're legit! This should make getting a foot from a dealer unfamiliar with the ruler work technique a bit easier. Or you could order from my shop....

frame quilting foot set- aka ruler foot for free motion quilting with rulers

In case you are wondering, that second foot is fabulous if you put your machine into a frame system, or get creative and decide to do your free motion quilting from the end of your machine. Otherwise, it's not much use.

I'm getting some quilting done today, so that's all I've got for now. Stitch on!

Quilting with Rulers: Double Curved Crosshatching

Working on my ruler work sampler again, this time using the double 'S' curve ruler from Rhonda Beyer. This was actually my very first ruler purchase way back when I first decided to experiment with the Janome ruler foot.

Quilting with rulers on a domestic sewing machine-using a double S curve ruler for crosshatching
Because of the asymetrical nature of this ruler, I marked the first two lines to make sure it was even.

Nothing like starting out with one of the more tricky rulers. This ruler has two different curves and they aren't symmetrical. I use a piece of tape to mark where I want to start or end my curve. Then when I'm ready to do the other side, you've got to flip it over to get the mirror image curve.

double curved crosshatching

It's a great ruler, but don't set it aside mid-project as you might have a hard time figuring out the position to get the correct curve when you start back to it. Several minutes were lost today as I tried to remember which side I was using and which orientation.

quilting with rulers double curved crosshatching

Because of the asymmetric curves, sliding the ruler down or up along the line of stitching can throw things off. So you've got to be careful if you want very uniform spaced crosshatching.

pretty feathered corner with double curved crosshatching done on a sewing machine and using quilting rulers

But it does result in some very graceful effects. I'll be using this ruler in all four corners. I will be doing some variations in each corner too. I like how it turned out, even if doing these pretty formal feathers is a bit difficult to get fairly uniform.

Don't forget that Craftsy's got another great sale going on. You can use my special instructor link to get the best sale prices on ALL the classes.

I'll be doing a more in-depth post about using this ruler next week and maybe shoot a video. What rulers, if any, are you using in your quilting lately?

Go Slow

When you've left your kids twice during the summer and then birthed a new baby in the form of a Craftsy class, the quilting slows down for some important things.


Like this beautiful, creative, crafty, free-spirited girl of mine. We've been sitting down to watch a Craftsy class on crochet together, Crochet Basics and Beyond. She's been crocheting for a while, but not following patterns and not really wanting me to teach her more than a few basic stitches. She likes free form crochet. After going through enough yarn to wrap around our house a few billion times, much of which ended up looking like a shag rug went through a shredder, she's now delighted to follow a class together. Even more so when she realized the instructor was the author of her favorite crochet book, Teach Yourself Visually Crocheting, Kim Werker. My daughter is so worth going slow for.

But I have gotten some quilting in between answering emails and questions/discussions in my class, doing some promoting of the class, trying to get some other work done, and more.


This quilt is worth going slow for too. It's a nice sampler quilt that I challenged myself to piece. See, I'm really all about the quilting and have always thought I was a pretty poor piecer. But I took my time and got it put together quite well.
 
curved crosshatching on a regular sewing machine


Now I'm using it to showcase a wide variety of ruler work designs. I'm using a light turquiose thread to show the quilting better, which of course means any little bobbles show. It reminds me of watching gymnastics: "Oh! A little bobble there. That's going to cost her." Nevermind the girl may have done a triple handspring with a 180 twist on the beam, a little bobble shows.

For me, it's not the quilt police or even show judges that I'm worried about. It's my own perfectionistic tendencies and inner mean-girl. But I'm getting better at shutting up my own worst critic. I planned to take a picture of this area below to show you why you should go slow when you start stitching with rulers.


Once I got the camera out, I could hardly see the spot that I wanted to show you. It really wasn't that bad at all. I'll get to the tip in a moment, but let me just point out the bigger thing here and that is if you see some quilting as you stitch that you don't like, step away from the quilt for a moment. Spread it on a bed or take a picture (not with the macro lens!) and then decide if it's something that really needs fixing.

What I wanted to point out is that it always pays to start out slow when free motion quilting, especially when doing ruler work. There are some side-to-side forces on the fabric sandwich and while you're using your needle down function (I hope you are!) everything is secure. But the minute that needle goes up, if there's tension in the wrong direction, the quilt can shoot off from where you wanted those first stitches to go. So take it very slow until that first stitch is in and the quilt is under your full control.


This part above definitely needs fixing! I got a little careless and stitched right into the frame of my curved crosshatching. But it was easily fixed.

free motion quilting with rulers on a sewing machine

Another block down, but what will I do to finish out that sashing design? It's reminiscent of the frame border I teach in my class, but in a much smaller scale. It's done with the BFF from the Quilted Pineapple (See her ad for templates in the right sidebar), but I don't want to treat it like that design. I'll quilt somewhere else while I think about it.

Speaking of going slow, if you're new to ruler work, don't feel like you've got to run out and buy a ton of new rulers. You can learn the technique and explore a lot of designs with just a straight ruler and a curve or two. There's plenty of time to add to your ruler collection. Of course, if you want to buy a bunch, I'm hoping you'll visit some of my sponsors or wait another week or two for my shop opening. I definitely didn't go slow when ordering rulers and templates for my online shop. If I think too hard about how much I have spent, my heart starts to race!