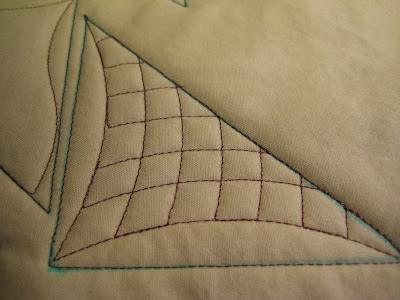
See? Not bad. But the video? Not so good. It's long, boring and rambly. Maybe I can shoot a different one soon. I'll add it to my To-Do list, the one that's got me so overwhelmed that I don't seem to be able to do anything. Ever have days like that? It's all part of my regular life with the addition of my big secret project, which hopefully will get to a point where I can either drop it or move it along in the next month or so.
Any who..... here are the rulers below that I used. The straight ruler I used to help get nice, straight lines for my triangles. The ruler along the top is a double "S" curve ruler by Rhonda Byer that can be ordered through Quilter's Rule. Her double "S" rulers are the ones used in Karen McTavish's book Custom Curves
I used the half circle ruler for the curved crosshatching since the triangle was small. The regular curved ruler has too slight a curve for this size triangle. The rulers with the pegs are Fine Line Rulers from Accents in Design. The pegs and velcro hooks on the underside make them easier to use on a sitdown machine where the quilt and ruler need to move as a unit.
The half circle rulers don't have the handy 1/4 inch markings along the curve though, which is unfortunate. I had to eyeball my spacing. Though it came out nicely.
My hubby is home this weekend (did I mention he's been working on an out-of-town project for the past 6 weeks with at least that many to go?) and I'm hoping to talk out some of my plans and such with him and try to get things workable before I go bonkers.
I am hoping to re shoot the video soon and make some new ones too!
Enjoy your weekend and practice your free motion, even if it's just some doodles!
For other FMQ inspiration, check out Leah Day's FMQ Friday Link Party.


You can use a wet erase marker on your rulers, mark whatever reference marks you want for that project, and you can wipe them off with a damp paper towel after.
ReplyDeleteOr...you can use a sharpie, and it will still come off later-- with a shot of hairspray
Brilliant idea! And I have wet erase markers and Sharpies, which will also come off with rubbing alcohol.
DeleteDid you post your video to YouTube? Your quilting looks great, so even if the video isn't perfect, it's still worth sharing. Don't beat yourself up too much for rambling (I do it ALL the time) because chances are someone out there will appreciate your train of thought. Beautiful quilting!
ReplyDeleteThanks for the encouragement Leah!
DeleteWhat size curve templates would you recommend if on a limited budget?? I have the "Line Tamer" for the straight line stitching but would like something for curved crosshatch. I was thinking the smaller and medium sizes would cover a variety of needs. Thanks. I really find all your posts so helpful!!!!! Hugs.........
ReplyDeleteIt all depends on what size spaces you'll use the rulers. You want the ruler to big enough that you don't have to slide it down to complete the line but small enough that there's enough arc in small spaces.
DeleteI like what you're doing. The finished triangle brings to mind the blog post I put up yesterday; it features some ship sails. I'd love to see your video :)
ReplyDeleteI am having a problem free motion quilting, ever so often my quilt hangs up and when I try to move it it won't budge. So I pull and then get a big stitch. Then there is a small loop on the back. I am using 0 stitch length, feed dogs down on my janome 4000 . Ihave had it for 18 years,, my stitches are goo
ReplyDeleteGood, tension about 4 . I have been trying everything to fix this,, thx, Maggey
ReplyDeleteHi Maggie
ReplyDeleteIt’s kinda hard to diagnose over the internet, but I’ll try my best. When it hangs up, does it seem like something down in the machine? If so, I wonder if you’ve got a burr or rough spot that the stitch is getting hung up on when it is forming? Have you tried using a single hole needle plate? Have your bobbin case and hook checked over for burrs or rough spots. Getting the quilt “hung up” but still having good tension and only a loop of thread on the back makes it sound like it’s not a huge machine issue, but still very curious.
Now, if it doesn’t seem like it’s something in the bobbin area, check and make sure the foot isn’t too low, or that you’re not at a thick spot that will cause the quilt to get stuck. Make sure also that the quilt isn’t getting hung up on something around the machine as you quilt, especially if you are pin basting. (Sorry if this seems a simplistic answer, just making sure I cover all the bases.)