Pages

Free Motion Monday: Gimme a "C"! Week 5

It's the last post for the "Gimme a C" series here on the blog. Coincidentally, it's report card day for my oldest 2 kiddos. Happily, I am only seeing "C's" here on the blog. After being homeschooled until 3rd and 4th grade, I am pleased with straight B's. What a big transition for them!

Speaking of transitions, back to quilting.


I shot a video of my latest C's. I even tried out some Aurifil while doing it. I've been wanting to see if the thread would live up to the internet hype. I haven't stitched with it long enough to make a judgement yet and I only have one spool of the white, 50/2 thread. (How does one get lucky enough to get spools for free from these folks? Seems like everybody's reviewing it these days.) I do like the slight sheen of it and had no problems while stitching during the video.


I'm keeping this 5th post of the month short and sweet, but if you've been practicing along, please link up below and share what you've done.

Next month I'm going to post one beginner design each week. So if you're new to free motion quilting, follow along to get that all necessary PPP done. (Practice, practice, practice!)

Here are the link up guidelines:
  • Keep your post relevant to this quilt along please. (This month is unspecified, so anything dealing with free motion quilting is fine!) Spammy posts will be deleted.
  • Make sure you link up to the individual post, not your home page as nobody wants to have to search around for the post if they're a little late to the party.
  • Reciprocate! Link back to this post somewhere in your post or use the clickable blog button in your sidebar. You've got to dance with the one who took you to the party, so make sure you link back.
  • Don't be a wall-flower. (Talking to myself here too. In person I am so stinking shy!) Visit the other links, be sociable, and leave comments.
  • Please make sure you leave me a way to contact you if you are a no-reply blogger, especially if you ask a question.

Ruler Toe Adaptation for Bernina

This post has been updated, see the bottom of the post!

In my quest to help folks enjoy free motion quilting and introduce using long arm rulers on domestic sewing machines for fabulous quilting designs, I have been guilty of creating foot envy among quilters who don't have a Janome machine, Janome-compatible machine, or other machines with a ruler toe available.

A regular FMQ foot on left, and the Janome Convertible FMQ foot set, plus the ruler toe on right.

Bernina users have been the most affected, and with good reason, Bernina usually has one or more feet for every technique out there. They are like the Imelda Marcos of sewing machines! Bernina even has fabulous little organizers for all their feet, like a tiny closet.


I still have hope that Bernina will come out with their own ruler toe soon, because they make such great sewing machine feet. If you own a Bernina, don't forget to email their customer service and ask them about it.

But in the meantime, quilters are resourceful folk. I've had readers tell me about gluing a washer or O ring onto a free motion foot and yesterday I received this comment on the blog:

Bonnie CulbersonSeptember 25, 2014 at 4:07 PMHi Amy, I am happy to report that I bought the Janome Convertable Free Motion Set and the #75 Shank for my Bernina 710. My DH filed a small place on the Janome part and made it fit my #75 Shank! I added the Janome Ruler toe and it works like a dream! I am so excited to get started. Now I just have to buy the rulers to start practicing! Thanks so much for you informative blogs! I am so inspired!

I wanted to pass this along to you. To be clear, she filed the Janome foot, or rather part of the shank. I like this as I am loathe to recommend something that would alter your Bernina.

So if you are handy, or you've access to a handy person, you might want to consider this route to getting a ruler toe for your Bernina. If you try it, update me on how it's working for you.

Update! We now have a tutorial for using the Janome Convertible Free Motion Foot Set and ruler toe on Berninas here: Ruler Foot for Berninas: A Tutorial.

Free Motion Monday: Gimme a "C" Week 4

It's Monday! I've done my C work with a pen this week, since I've been working on a different project on my machine.

I've found that my C's look better when I do a little more backtracking on each end. Below I used red marker to show the parallel foundational lines and the did my C's. Hopefully, then you can see the difference in the amount of backtracking done with the black pen along the foundational lines.


Without backtracking, or very little anyway, the C's have more of a hook/boomerang/banana shape. In fact, those are names for which this shape is called and are useful for other designs.


Here's a comparison pic of both methods. Again, I am so glad that I quilt this better than I draw it, but drawing it is important.


As I shared in Week 1 of "Gimme a C," I wanted to improve my C's so I could use them better when McTavishing. So here's a doodled version of McTavishing, a bit heavy on the C's, just so I could practice.


Next Monday I hope to stitch this out in a real sample. I hope you've had some time to try C's for yourself in the design of your choice. If you've blogged about it, share it below.

In other news, I'm working on a post about my favorite marking tools, since many of you asked about them.

Here are the link up guidelines:
  • Keep your post relevant to this quilt along please. (This month is unspecified, so anything dealing with free motion quilting is fine!) Spammy posts will be deleted.
  • Make sure you link up to the individual post, not your home page as nobody wants to have to search around for the post if they're a little late to the party.
  • Reciprocate! Link back to this post somewhere in your post or use the clickable blog button in your sidebar. You've got to dance with the one who took you to the party, so make sure you link back.
  • Don't be a wall-flower. (Talking to myself here too. In person I am so stinking shy!) Visit the other links, be sociable, and leave comments.
  • Please make sure you leave me a way to contact you if you are a no-reply blogger, especially if you ask a question.

Marking Free Motion Quilting Designs

I did something this week when quilting that I don't normally do: I marked my quilting design.

I do get asked from time to time about marking designs, usually by beginners who are busy trying to juggle all the variables of free motion quilting and find that having a line to follow seems reassuring. I really try to discourage marking designs. I'm not talking motifs or major foundational lines like a feather spine here, rather, marking every line of stitching for even a filler design.

marking a free motion quilting design

 I find that many people will tense up more when following a line or make more noticeable 'course-corrections' trying to follow the line than when the design is unmarked. Of course, not marking means that the shapes of the design need to be in your head, built into your muscle memory via practice.

But that's my opinion and I know there are others who encourage using a marked design for beginners. There are even pre-printed panels and stencils available for practicing your free motion quilting. I'm sure some folks find them helpful. If you feel stumped by the "where do I go" feeling, and marking makes it more comfortable, give it a whirl, but try to use the lines as merely a suggestion of where to go. Once the lines are gone, no one will know that you didn't stitch right on them.

I still swear by doodling designs on paper (or other drawing methods), practicing on a batik quilt sandwich using no thread in the needle, and plenty of practice.

When do I recommend marking designs?

Grid-based designs
Reference marking: Marking a spine, lines for grid-based designs, measuring off intervals for some ruler or template work, and foundational lines for some designs (like the straight lines between "C's" from Week One of this month's Free Motion Monday). Many designs in borders and sashing benefit from marking.


Many of the trees and shrubs were doodles with an erasable marker, though I didn't follow the lines very much in actual quilting.
 Motifs: Definitely mark motifs. Whether you need to mark the entire motif, like a large scroll-shape that will be left unquilted, whole cloth quilt elements, and other design elements or maybe you just need to make some indication of where a motif will go or the orientation of it.

Marking with my favorite kind of marker.

Visibility Issues: When quilting on a domestic sewing machine, the visibility can be limited to the area directly around the needle and our hands. This is especially true when quilting a large quilt. Sometimes we need to step away and look at the whole of the quilt and mark certain areas. Maybe you've got a nice area of 'white space' to fill and you want 3 different fillers across it. Mark those areas. You can get in the flow with one design and never realize you went too far. When doing large designs that are bigger than the space between your hands, you might want to mark it, since you might not be able to see the entire design at once.

When you just can't get it right: A difficult design have you stumped? Maybe you can make a feather plume to the right, but when you go to the left, it looks all squished. Maybe you want to make sure your pebbles are all the same size and round, not roundish. (Be realistic here, do you need to trace a half-inch circle repeatedly over your entire quilt? *shudder* I hope not.) Sometimes you'll have an odd space to fill and you know only a certain stitched path will look right. Mark it. Sometimes I'll doodle the design on my quilt with an air-erase marker to see how the design will look, like a tight inner curl of a feather. Then I'll quilt it.

free motion quilting
Motifs in a wholecloth need to be marked.
So why did I mark my design?


It was a combination of visibility and I just couldn't get the design right. I was stitching a very narrow border between two larger borders. The borders on either side were dark fabrics while it was a cream fabric and I was stitching in cream thread. The design was a deceptively simple design, an open "S" curve from side to side of the 3/4 inch wide border. But I couldn't see it well and I kept getting the spacing uneven and sometimes overshooting my stopping point and stitching the cream thread up onto the dark fabric. That, I had to avoid at all costs. After the 4th ripping in what seemed to be a few minutes, I went ahead and marked it.


See there's only one thing I hate worse than marking my quilts and that's un-quilting! I gave myself permission to not stitch directly on the lines and then began stitching again. Worked like a charm.

So, when it comes to marking, do what works for you! Do you do a lot or a little marking?

Free Motion Monday- On Tuesday!

I totally missed posting yesterday for Free Motion Monday's Linky party. I guess I went from "C's" to an F! But I think I can find some extra-credit to make up for it.

free motion border design
Nearly done with this quilt! Just the borders to finish.

 Metaphors aside, my projects are overwhelming me. It's hard to keep up, plus I've been helping a neighbor with some last-minute childcare lately. Let's skip the linky this week, and we'll try again next week. Then I might switch to a monthly link party that's open all month or something different.

I'm a typical quilter, more ideas in my head and projects in the queue than there are hours in the day. Plus, I'm not the most efficient with my time. How do you handle your quilt projects? Are you like me, or are you one of those disciplined "One project at a time until it's all done" kind of folks?

I read Gwyned Trefethen's blog occasionally and she is a marvel at setting goals for her quilt art projects and doing them. I should read it more often, maybe her discipline would rub off on me!


My daughter is very crafty and I think my quilting is definitely rubbing off on her! I am pretty certain those are feathers coming off her flower.


For her birthday, I bought her a sketchbook for all of her dresses she's been 'designing' plus some new gel pens, some with glitter! Every 8yo girl loves glitter, and the pens aren't near as messy as the real glitter! Making some dresses for her (and with her) is in the projects list.

So, dear readers, thanks for visiting and now I am off to quilt!

Saturdays are for Quilting!

What a fabulous couple of days I've had! Working at Sew Simple, doing some extra stuff there and finally getting into the groove with my customer's quilt.

quilting a Dresden in free motion
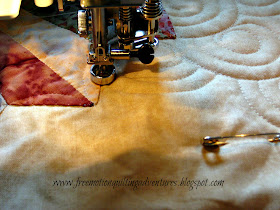
Yes, I'm using my ruler toe on my Janome convertible free motion foot set even though I'm not using rulers. It does reduce visibility, but I'm used to it and it's very good at gliding over occasional thick seams.

Today there's been just enough rain that I don't feel like I ought to be doing yard work. I'm missing one fabulous little girl who is at the beach with my parents for her birthday and the two boys are very content, alternating between reading, playing on the porch, or playing a few video games.

ferny feather corner

 So I've been quilting away. I had lost steam on this project when the border I had started just didn't work out. I had a half-circle ruler that fit this inner border perfectly and echoed the shaped of the four half-Dresden plates. But it didn't work out for the length of the borders. I changed it up, but after finishing it, I wasn't satisfied. I ripped it all out.


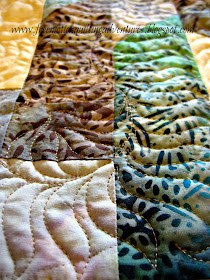
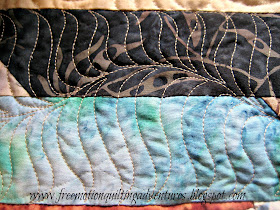
 If you look closely, you can see needle marks left in the batiks. They'll disappear after I give the quilt a light misting of water from a spray bottle and a quick rub with a piece of batting. I re-did the border with a contemporary feather alternative, the fern feather.

My 'Norme' sized "Leaves Galore" ruler by Sue Pelland was a perfect fit to mark the spine too.

free motion quilting

Stitching the fern feather felt and looked so good. It gave me my quilting mojo back. There are just times in quilting when you have to step away from a piece and let a few ideas percolate. When you get back to it, the creative flow returns and it is wonderful!

free motion quilting spirals

Here's the quilt 'puddled' under my machine. That bit of blue on my machine is Painter's Tape. I use a loop of it and stick my bits of thread to it. With the quilt puddled, I only need to move the flat portion while I quilt. The first folded 'peak' of quilt rises or stretches out as I move the quilt and the rest stays still. That reduces the weight of the quilt for smooth movement.


I flipped up a corner of the quilt for a quick peek at the back. It's a bit wrinkly since it's sitting on the rest of the quilt instead of laying out flat.


Since the owner has blogged about this quilt and my quilting of it, I'm going to link to her blog. Ellen Parrott does beautiful work with art quilts, especially her fabric portraits. Fabulous! I'm getting to quilt a few of her older, more traditional quilts. She also meets up with a local art quilt group for challenges, which I think is really cool.

I hope you are getting to do something quilty or fun this weekend and are having some lovely fall weather.

Free Motion Quilting = Problem Solving

One of the challenges of quilting in free motion (as with many things, quilty or not) is facing the challenges that come in the form of multiple variables. Maybe that's why I find it such an adventure. There's always something to adjust, fine tune, or fix. On the other hand, that's why many people find it so frustrating. It can be an exercise in problem solving.
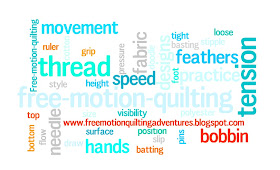
Free motion quilting word picture

There are so many variables involved! Many of them are in the graphic above, but there are many more.

I think that it's important to understand that there are always going to be little issues to address as you free motion quilt, even once you've gotten good at it and have plenty of experience. I use my seam ripper regularly and if I use a different combination of threads, fabric, etc. than I usually do, I still have some problems to adjust and figure out. I've even heard professional long arm quilters find after a prolonged problem-solving session chalking it up to getting a bad spool of thread now and then.

How willing are you to play super-sleuth when it comes to your machine and FMQ? I think that directly relates to how successful you will be at machine quilting, especially if you vary your materials, threads, etc. I have heard folks say, "My machine can't use __________." Usually a type of thread. It can become a No-Go Quilty Zone. I think it's more like, "This________ requires more adjustment than I am willing to make." I have this issue too. Certain threads I just don't like as much because I do have to fiddle with them or thinner battings that require me to use my Straight Stitch Needle Plate to keep them from going down into the bobbin case. (I admit it, I hate changing stitch plates back and forth. Plus the straight stitch plate for my Janome 6600 doesn't have a true single hole.)

The most important thing is to figure out what works for you!

That thought deserves a line of it's own. What works for you most of the time, anyway. Then develop a system for problem solving when you have an issue. My usual process is: tension, threading, thread, needle, and foot height. That little list takes care of most of my issues.

One of my troubles, especially with thicker threads, is having the hook somehow split the top thread as a stitch is being formed. This makes a small birds' nest and causes the thread to split, with only part of it making a proper stitch, followed by thread breakage. I have yet to solve this annoying, but intermittent issue with anything other than the seam ripper. I've had my machine checked out and nothing has become apparent, so I just fix when needed and use a thinner thread most of the time to avoid the issue. Though, honestly, it's nearly made me say "I can't use this thread" but I hate to admit defeat.

I'm afraid that some folks that are new to free motion quilting may encounter some of these issues and decide "I just can't do it" or "I need a newer/bigger/better machine" and lose the desire to pursue their FMQ skills. Be encouraged and encourage others. It's an art, not an exact science.

In other news, the winner of the Bernina buttons is: Ann! I have sent Ann an email and will pop those buttons in the mail as soon as possible.

Don't forget to check your settings occasionally to make sure you are not a no-reply blogger. It's a lovely glitch that happens now and then to make your email hidden when you comment. It happens more often if you've linked your Blogger and Google+ accounts. Google "fix no-reply blogger" for a few solutions.

Also, I want to point out that Accuquilt is having a free shipping promotion right now. If you've ever used these fabric cutting dies or their cutter, you know they are heavy! You can get to Accuquilt's site through the ad on the right sidebar.

Have you found yourself ready to give up on something that's giving you trouble instead of problem solving to fix it? Do you have any No-Go Quilty zones?

Free Motion Monday: "Gimme a C!" September Week 2

Another Free Motion Monday Quilting Adventure, and I'm working on my "C's". There are certain shapes that so many free motion quilting designs are built on; "C's", circles, "S's", hearts, straight lines. I am determined to get good at them all!


Here's the design I showed from last week. This time in matching thread so every tiny bobble doesn't show. It's getting better. Sort of....


I did some curvy worms or stacked coins depending on whose name for it you use. I'm sure there are a few other names for these "C's" that just stack upon themselves in a free-form way. Then it morphed into some ever increasing paisley.


But where I want to get good with my "C's" is in McTavishing, so that's what I practiced next. I noticed that I needed to practice stitching the "C's" in both directions. Sometimes you need to lead with the convex side, and sometimes you lead with the concave.


The drawing helps to illustrate what I mean. I drew both of these rows starting from the left and working towards the direction shown by the arrow. Leading with the convex side (curving out) as in the bottom row seems to be the easier way for me.

That's all I've got for today. More next week on this design and making "C's". Don't forget to comment on Wednesday's Post, "Who's Got the Button" to get in on my Bernina button giveaway if you are a Bernina user living in the states. I'll announce the winner Wednesday.

Here's the linky if you've bee working on your "C's" and want to show them.

Here are the link up guidelines:
  • Keep your post relevant to this quilt along please. (This month is unspecified, so anything dealing with free motion quilting is fine!) Spammy posts will be deleted.
  • Make sure you link up to the individual post, not your home page as nobody wants to have to search around for the post if they're a little late to the party.
  • Reciprocate! Link back to this post somewhere in your post or use the clickable blog button in your sidebar. You've got to dance with the one who took you to the party, so make sure you link back.
  • Don't be a wall-flower. (Talking to myself here too. In person I am so stinking shy!) Visit the other links, be sociable, and leave comments.
  • Please make sure you leave me a way to contact you if you are a no-reply blogger, especially if you ask a question.

Who's Got the Button?

Didn't there used to be a child's game where they sang, "Button, button, who's got the button?" Anyway, I have the buttons! A whole big box and several jars worth.

A family friend's dear departed mother had owned a small quilt shop, sadly before I knew her, and left a lot of odds and ends when she passed. I am lucky enough to have received a few big boxes of things from that stash.


This past weekend found me making a few hair do-dads for a little girl and I needed some buttons for the felt flower centers. I went rummaging around in the giant button stash and found just what I needed. Love it when that happens!


In addition, I found some treasures to share with you. I wonder how old these button cards are?


Then there are these buttons above, which remind me of Croquet balls. If my daughter was still in love with fairies, I might be inclined to set up a tiny game of croquet on a patch of moss.


Does anybody know what these mother-of-pearl things are? They don't look like they could be part of a clasp. The slot is about 3/4 inch long and the backs are plain.


Finally, there are these Bernina buttons. You guys know I am a Janome girl, so I'm going to give these away. Identify yourself as a Bernina user who lives in the USA in the comments below, making sure you're not a no-reply blogger or I have an email for you, and I will pick a winner.

Free Motion Monday: Gimme a "C"!

Where does the time go?! It's the first of September, happy Labor Day to those in the USA, a Monday and time for a new design.

Columns of Cs free motion quilting design

Remember our first Free Motion Monday Series of McTavishing? That design used a series of small "C" shapes to get out of tight spots. I never felt really happy with my "C's", so that the design focus for this month.

Ick.

To give a cohesive design to work on, I'm introducing "Columns of "C's". This design has popped up in several quilters work, including Renae Haddadin's Fill'er Up: Quilting Designs, where she calls it "Column of arcs". There are a couple of variations of this design, some also are featured in Renae's book.


I'm quilting a customer quilt, so I used my back up machine, a Janome 3160. I use a modified standard free motion foot on it. I figure some folks might enjoy seeing a smaller machine used.


Column of "C's" is done by subdividing the quilting area with columns, and filling the columns with "C's". I prefer to echo my column lines so there's a channel between the "C's". I definitely need to practice this design and improve my "C's". Feel free to "Gimme a C!" in whatever form you want.


I also want to thank all of those who answered my "Roll Call for the Ruler Toe". A winner has been drawn for a giveaway of an Accents in Design ruler. "StitchinByTheLake" is my winner, assuming you live in the USA. I am compiling your responses into a reference chart for this handy ruler foot.

BTW, I drew 2 other folks first, but they were no-reply bloggers, so I chose again.

 Here are the link up guidelines:
  • Keep your post relevant to this quilt along please. (This month is unspecified, so anything dealing with free motion quilting is fine!) Spammy posts will be deleted.
  • Make sure you link up to the individual post, not your home page as nobody wants to have to search around for the post if they're a little late to the party.
  • Reciprocate! Link back to this post somewhere in your post or use the clickable blog button in your sidebar. You've got to dance with the one who took you to the party, so make sure you link back.
  • Don't be a wall-flower. (Talking to myself here too. In person I am so stinking shy!) Visit the other links, be sociable, and leave comments.
  • Please make sure you leave me a way to contact you if you are a no-reply blogger, especially if you ask a question.